This post contains affiliate links.
Having a rooftop solar installation on your RV can save a lot of money when it comes to camping fees. RV park and campsite fees are one of the most expensive aspect of RV living. These costs can be reduced by off grid camping and boondocking.
So why should you install solar panels on an RV? Installing solar panels gives you the ability to park off-grid for days without worrying about running out of power. This saves money on campsite fees and generator fuel. You can discover awesome off-grid places to stay when you aren’t tied to shore power.
Depending on location and amenities, RV parks can run a traveler upwards of $80/night or more which can deplete the monthly budget quickly. Being long term travelers, it’s important to try to limit those costs by shopping around for lower cost parks or boondocking sites which often require you to get by with fewer to no amenities.
The key to saving some dough while keeping the lights on for us has been the addition of our RV solar system. The total cost of our system was about $500 which has paid itself back quickly. It has also allowed us to camp in the most peaceful and remote locations we otherwise would have missed out on.
A decent solar panel array on the roof of an RV or trailer will allow for the use of the essential components of your electrical system like lights, water pump, charging small electronics and even powering an inverter. This will be plenty to operate small ac appliances or charging a laptop. It’s unlikely you’ll be running the air conditioner, vacuum or microwave but the essentials will be there when you need them.
Table of Contents
Key Definitions
There are a number of terms relating to electricity used in this guide that are important to understand. I have included some definitions below to clear up any confusion.
It is often easiest to consider electricity in terms of water. A dam holds back water in a reservoir as potential energy. Once released the water is able to do work like turning generators on its way down to the river below.
Much like a dam, a battery holds electricity (reservoir) waiting for us to flick a switch and release it’s electrons (water) through a lightbulb (doing work) to flow to ground (the river below).
Voltage – measured in volts, Voltage is a measure of potential difference. Like the level of water held behind the dam, a battery’s voltage level indicates the amount of potential work it can accomplish.
Current – Measured in amps is the amount of force or push the volts have behind them to complete their work. Like in the water example, if a larger pipe is used to move the water from the dam to the river there would be more push to turn the generator.
*It is important to keep in mind that higher current flow will deplete a battery faster.
Power – Measured in watts is the product of volts and amps performing work in a circuit. Solar panels are usually rated in watts.
Power = Volts x Amps or P = E x I
If a 100 watt solar panel charged a battery at 12 volts it could supply 8.33 amps. 100w = 12v x 8.33a
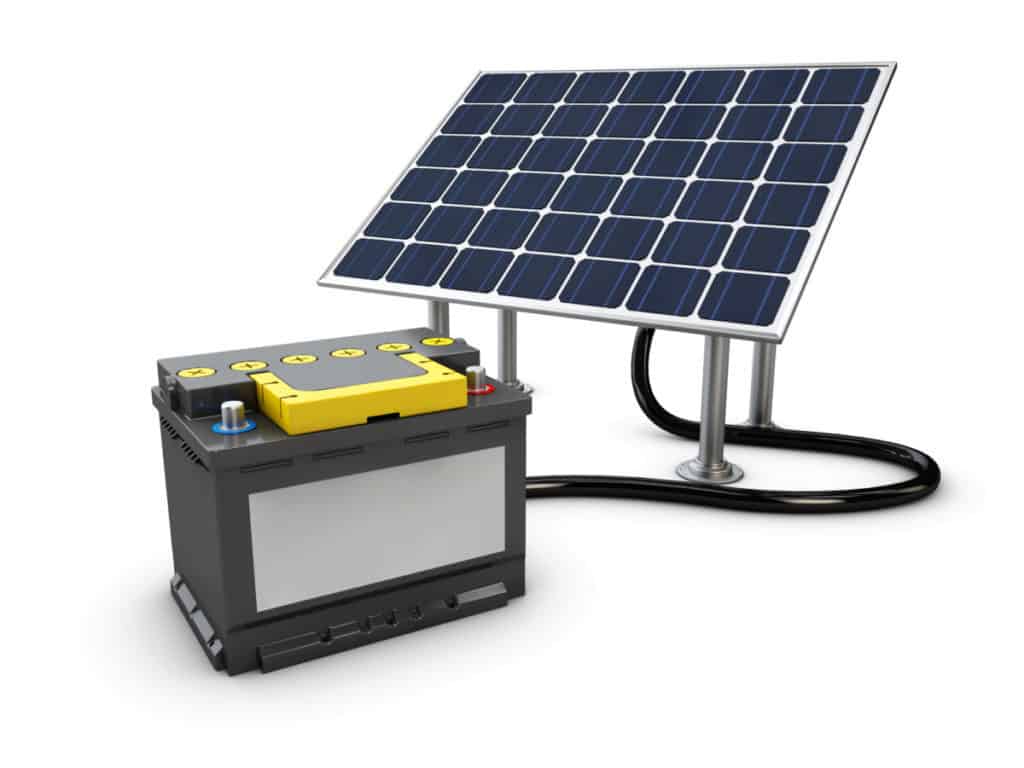
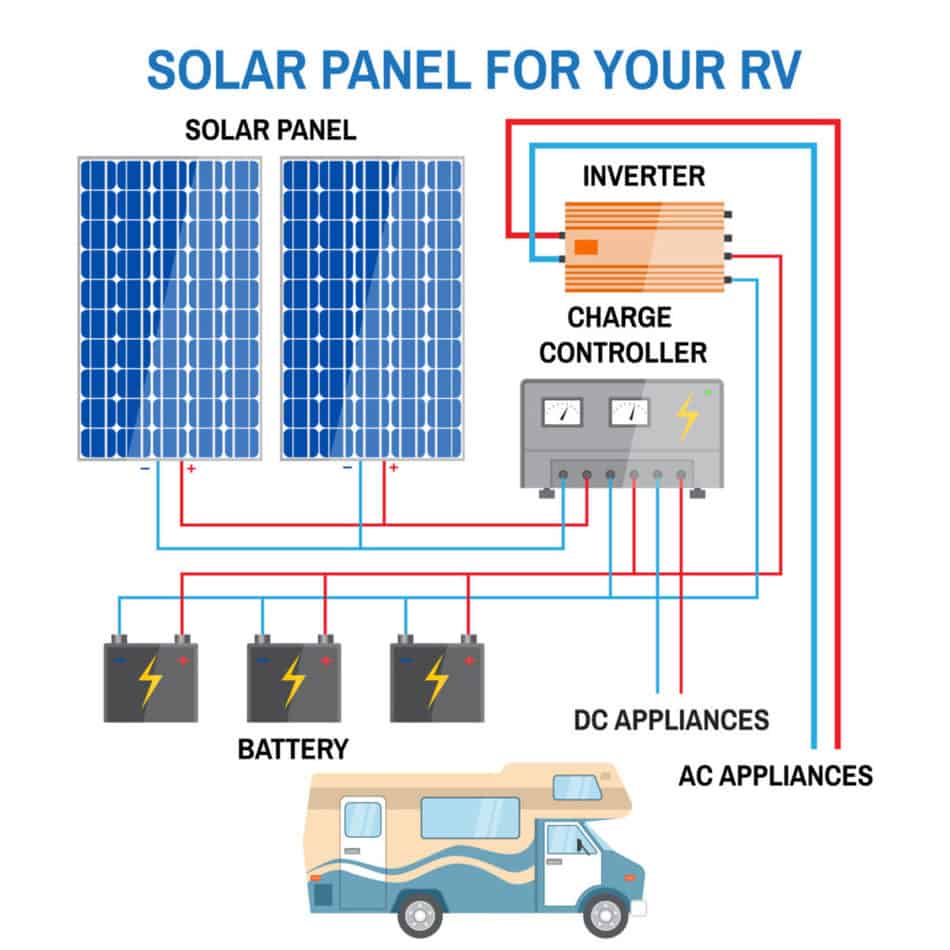
Anatomy Of A Solar System
An RV solar system consists of three main components:
- Solar Panels
- Solar Charge Controller
- Batteries
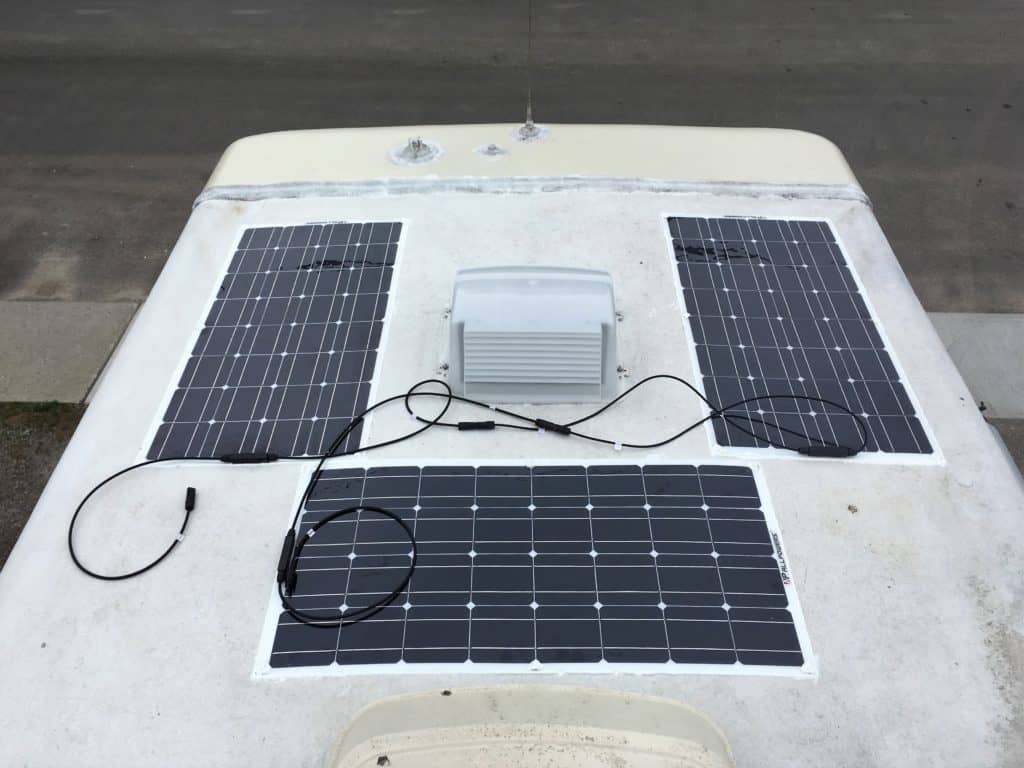
The solar power system we installed consisted of three 100 watt flexible solar panels fastened to the roof and a 40amp solar charge controller located in the electronics bay at the back of the vehicle. Ideally, it’s best to locate the panels, solar charger and batteries as close as possible to one another as this will reduce power losses along the long wire runs but in retrofit situations options are often limited.
Types Of Photo Voltaic (PV) Solar Panels
Solar panels are made up of a collection of individual silicon cells connected together which produce a voltage when light hits the surface. Panels can come in many shapes and designs but the most common are rigid in an aluminum frame with a glass protective cover over the cells.
More recently, flexible panels have come on the market with a thinner design allowing for a more streamlined install and a similar power rating. Newer panels will also include a bypass diode which increases the system’s overall efficiency in shaded areas. I won’t get lost on the details of the bypass diode but I do suggest choosing panels with an integrated bypass diode like the ones we are using.
We opted for the flexible style of panel because the installation was as simple as some screws and silicone, no brackets were needed like the rigid panels require. The flexible panels also provide a more aerodynamic fit directly on the roof which will have less effect on fuel economy and are typically lighter weight than the rigid alternative.
If you’re like me, the thought of putting screw holes in your roof makes you uncomfortably nervous but trust when I say it’s not as bad as it sounds if done properly.
Solar Panel Defects
Like any electrical components even new panels can have defects causing them to function improperly or not at all. We had originally sourced our panels on eBay from a supposedly American supplier but after we received them we noticed they were covered in black marker suggesting they were rejects from the assembly line. They didn’t work because the diode had been installed backwards.
We had to fight for a week with our Chinese supplier before we could finally send them back for a refund. If we had not inspected them properly it would have been a disaster removing them from the roof to return.
Our sob story just highlights the importance of inspecting and testing the panels as step 1 to avoid any future headaches. In the installation portion of this article, I have detailed the steps to properly inspect your panels before beginning the installation process.
After our eBay mishap, we went back to our faithful supplier Amazon and bought three flexible 100 W Solar Panels.
Function Of A Solar Charge Controller
A Solar Charge Controller is an electronic device that accomplishes three main functions in an off-grid solar system.
- Receive the incoming power from the solar panels.
- Convert the voltage to approximately 14.5V to charge the batteries.
- Monitor the battery charge to ensure it is properly maintained.
In basic terms, it is the duty of the solar charge controller to convert the current coming from the solar panels into stored battery voltage.
A quality solar charge controller will also monitor the voltage of the battery system and control the charging current in a way that maximizes the efficiency of charging. This will go a long way toward reducing any damage that may be caused by overcharging the batteries.
The charge controller will also ensure the power coming from the panels is converted in the most efficient way to provide the voltage and current the battery requires without wasting any hard-earned power converted from sunlight.
Types Of Solar Charge Controllers
Charge controllers come in two main types,
- Pulse Width Modulated (PWM)
- Maximum Power Point Tracking (MPPT).
Automotive-style batteries like the ones used for RV house batteries will typically measure roughly 12.5-13.5v when fully charged but require a 14.5v charging voltage to properly reach that level.
Adding to the confusion, solar panels typically output 18-20v in maximum sunlight making it difficult to efficiently use the output of a panel to directly charge batteries.
Pulse Width Modulated (PWM)
A PWM charge controller uses up to 14.5v coming from the solar panels and uses that to charge the batteries. Any voltage above 14.5v gets discarded making a PWM controller inefficient for higher voltage panels.
Maximum Power Point Tracking (MPPT)

An MPPT charge controller can convert a higher voltage from solar panels to a more useful 14.5v required to charge the batteries. The excess voltage is then converted into higher current that can be put toward decreasing charge time. An MPPT controller costs more but is much more efficient.
This is the MPPT I purchased from Amazon for my solar system. There are a range of sizes and you’ll want to choose that fits your number of panels and allows for some expansion in the future.
For a system with only one 14.5v panel a PWM charger is a little cheaper and will work well. If you are using two or more panels above 14.5v however, I suggest choosing an MPPT controller for maximum efficiency of the system.
MPPT controllers are just one of the ways to charge your ebike using solar panels in your RV.
RV Batteries For A Solar System
In most cases, an RV or trailer will already have one or more house batteries for storage. This makes integrating solar panels and a solar charger to the existing electrical system the simplest solution.
This was the case for our application however we did end up replacing the batteries down the road. It’s a good idea to have a load test performed if your batteries are older. Most automotive parts stores will provide this service free of charge though you may have to disconnect and possibly remove your batteries for testing.
If you are designing your system from scratch or plan to replace your system’s batteries it is often easiest and most financially efficient to choose good quality deep cycle batteries. This is the type commonly used in RV and marine applications.
Deep cycle batteries are designed to handle higher current output and be charged and discharged more frequently as is the case in an RV house battery application.
There is a lot of talk about using 6V batteries in an RV which are typically used in golf carts. Implementing these batteries requires more technical design considerations and therefore a more complex system.
Another technological advancement in recent years is the availability of Lithium batteries like those used in electric cars. Lithium batteries are much more expensive than deep cycle lead acid batteries and more difficult to find replacements should something go wrong.
For the reasons listed above it is usually the most cost efficient to use standard off the shelf marine deep cycle batteries. It will limit electrical system complexity and allow fast and easy maintenance.
Inverters For RV Solar Installations
An inverter converts the dc voltage stored in your batteries into ac voltage for your 110v devices normally used around the house. This includes phone charging blocks and laptop chargers.

Depending on the size of your rig and system you may decide to install a permanent inverter. If your rig is small and requires minimal ac power when off grid you may just choose to use an automotive-style inverter which will plug into your vehicle’s 12v jack or cigarette lighter.
Both types are easy to purchase online like this 1100 watt model from Amazon for under $90. There are many different styles to choose from and it could get confusing. I chose a 1000 watt inverter to power my RV because the majority of my devices operate on 12V DC.
How Much Power Do I Need?
This is a major question when it comes to planning a solar panel system installation and the reason why so many people delay. There is no perfect answer to this question because the system needs to be sized to the electrical needs of the RV or trailer which depends on your typical electrical use.
If you want to know the power draw of your RV or Trailer an easy way is to use a simple online solar calculator (Disclaimer – The author had no affiliation with this website at the time of writing)
This will help guide you through and add up the current draw from all your devices you’d expect to be using at any time. This calculator will also suggest the components you can use or you can choose to shop around for similar devices on your own.
There are a number of steps that can be taken to limit the demand on a system by implementing energy-saving steps. Changing to LED lighting and installing USB jacks will avoid the need for a power-hungry inverter to charge your everyday devices. To get more information on converting to LED lighting check out this post and video.
Scheduling your power consumption will also assist in saving power for the evening when the panels aren’t producing power.
While parked off grid, we try to charge our laptops and other AC devices using the inverter during the daytime. This is when the solar panels are providing the most power to the system.
By charging during the day the house batteries can be charged in conjunction with our device batteries. By the time the sun goes down, all your batteries will be topped up for the evening demand.
Our three panels have proven to be more than enough to fulfill our needs because the stovetop and fridge run on propane while we are not on shore power.
Panel Inspection
A quick visual inspection should be enough to catch any damage that may have occurred in the manufacturing or shipping of the panels. It’s best to perform a check soon after you receive the panels so that you can return the defective ones quickly.
There should be no cracks or deep scratches on or over the cells and there should not be any nicks or cuts in the wiring. Once the visual is complete you should perform a couple of electrical checks with the panels in direct sunlight.
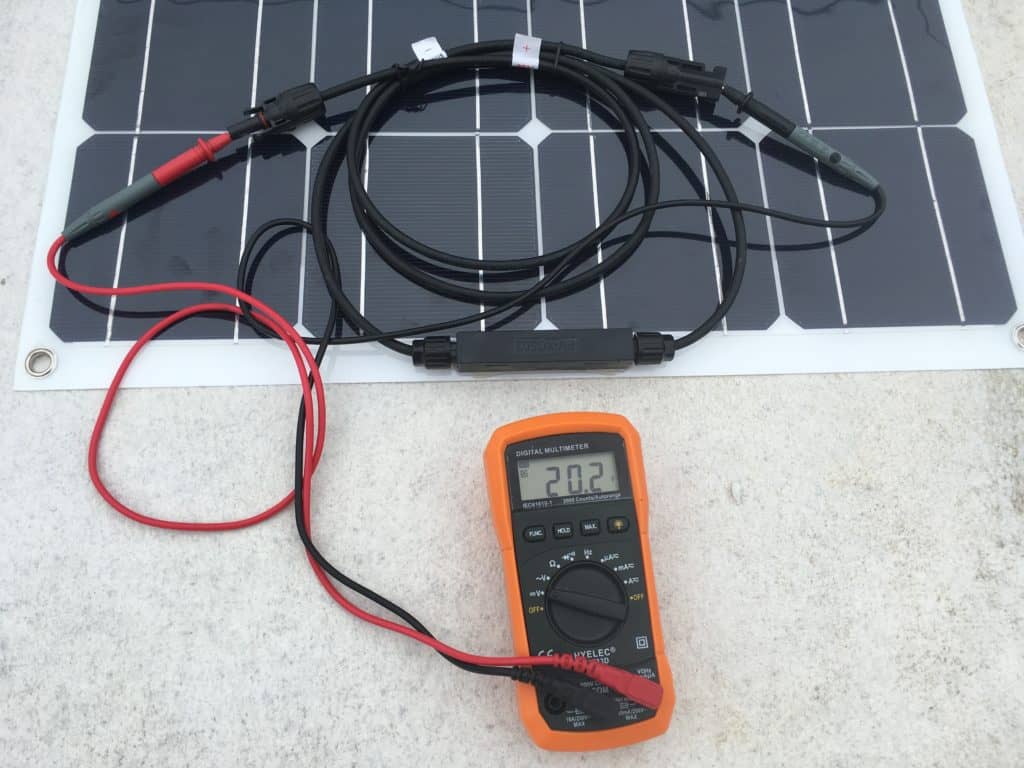
The following checks should be performed on each panel individually. The results on your multimeter display should match the panel ratings supplied by the manufacturer. There may be a sticker on the rear of the panel or paperwork within the shipping box indicating the panel’s Open Circuit Voltage (Voc) and Short Circuit Current (Isc). Measuring these values will verify that the panel is functioning properly.
Voltage Check
- Using a basic multimeter, set the mode to the DC voltage setting.
- Plug the meter leads into the wiring coming from the panel as illustrated below. Be sure to connect the red lead to the positive wire and the black lead to the negative wire.
- The voltage reading on the meter should match the open-circuit voltage (Voc) rating of the panel. The value should be between 13v and 20v depending on the panel and the amount of sunlight hitting it. In our case, the meter reads 20v when the panels are in direct sunlight.
Current Check
- Change your multimeter mode to the DC current or amps setting.
- With the leads connected in the same fashion as the voltage check, the meter should display the short circuit current (Isc) being generated by the panel. Again the values should be close to the rating from the manufacturer.
Once these simple steps are completed you can be confident that the panels are functioning properly and that you will not have to remove your panels once they are securely fastened in their final location.
Solar Panel Circuit Wiring
Solar panels can be wired in either series or parallel configuration. There are advantages and drawbacks to both.
Wiring Solar Panels Wired In Series
Wiring solar panels in series requires a lower gauge of wire and less length of wire than a parallel configuration. A series circuit connects the solar panels end to end with the output of one panel going into the next.
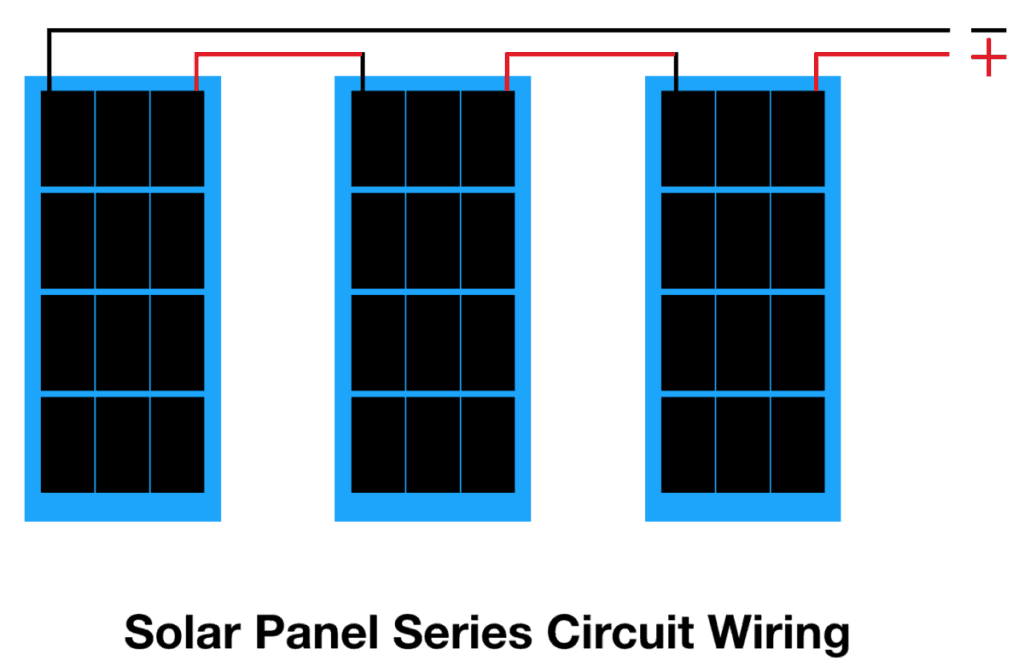
The voltage is higher in a series circuit but the current is lower allowing for a smaller gauge of wire. Because wire can be expensive and heavy, using a series circuit configuration will cost less and be a simpler installation.
Due to the higher voltage, it is important to use an MPPT charge controller like we discussed earlier. This will convert the higher voltage in to more current for charging batteries.
Wiring solar panels in series does have the drawback of limiting the current to the output of the lowest panel. Having panels with a bypass diode is extremely important in series configuration because it prevents a shaded panel from taking the output from the other panels.
Wiring Solar Panels Wired In Parallel
Wiring solar panels in parallel keeps the voltage level the same across all of the panels in an array but allows the current to be higher than a series configuration.
The effect of a single panel being shaded or damaged has a smaller influence on the output of the other panels in a parallel circuit configuration. Parallel wiring connects all the positive output leads together and all the negative output leads together instead of stringing the panels together as is done in a series circuit.
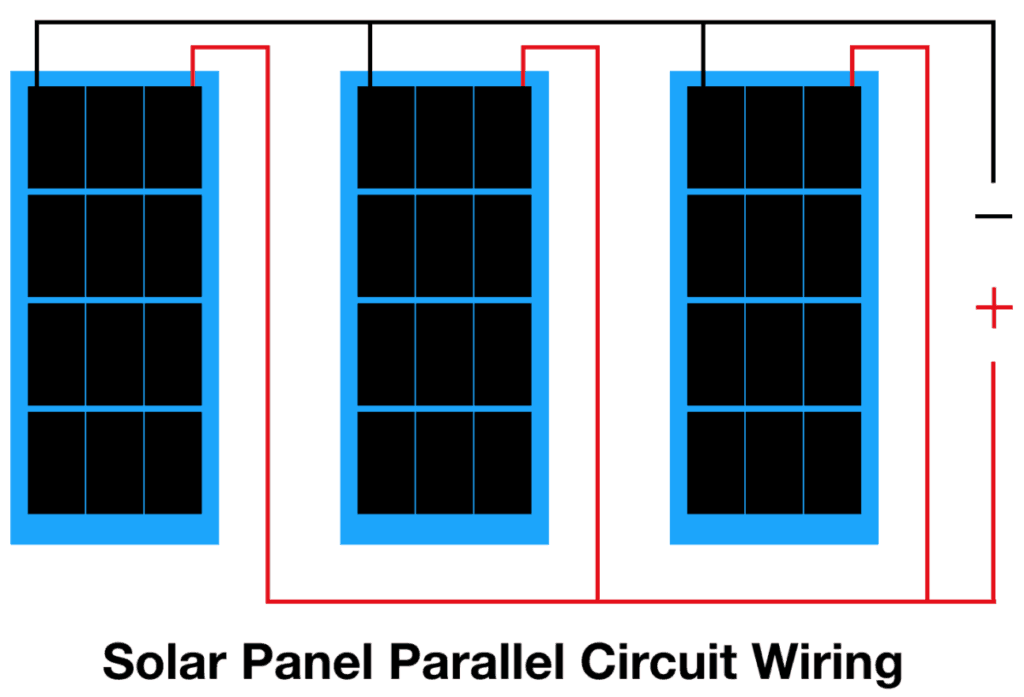
The drawback of parallel wiring is that it takes more length of wire and a larger gauge of wire making a parallel installation more expensive. Due to the extra wiring required the circuit is ore complex making the installation more complicated.
Installing Your Solar Panels
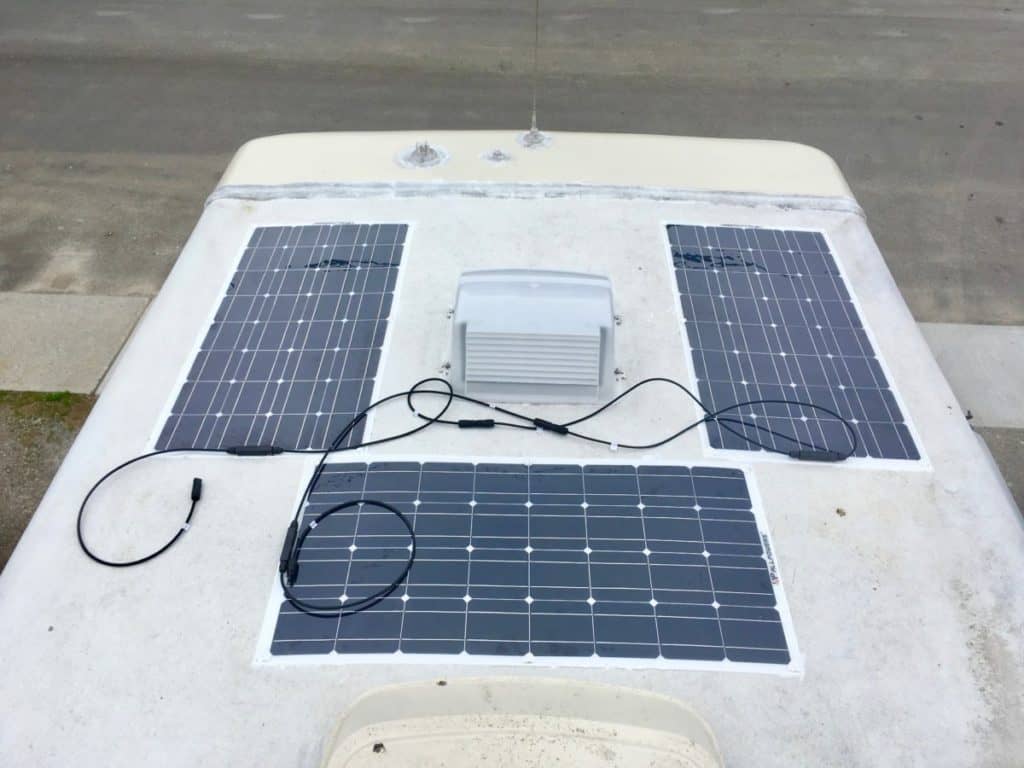
The first step is to decide the placement of the solar panels on the roof of your rig. We chose to install our solar panels together at the front of the RV because it had the most open space. Since the panels we gathered in one single location it’s easier to orient the RV into the sun in locations where trees and shade could be an obstacle.
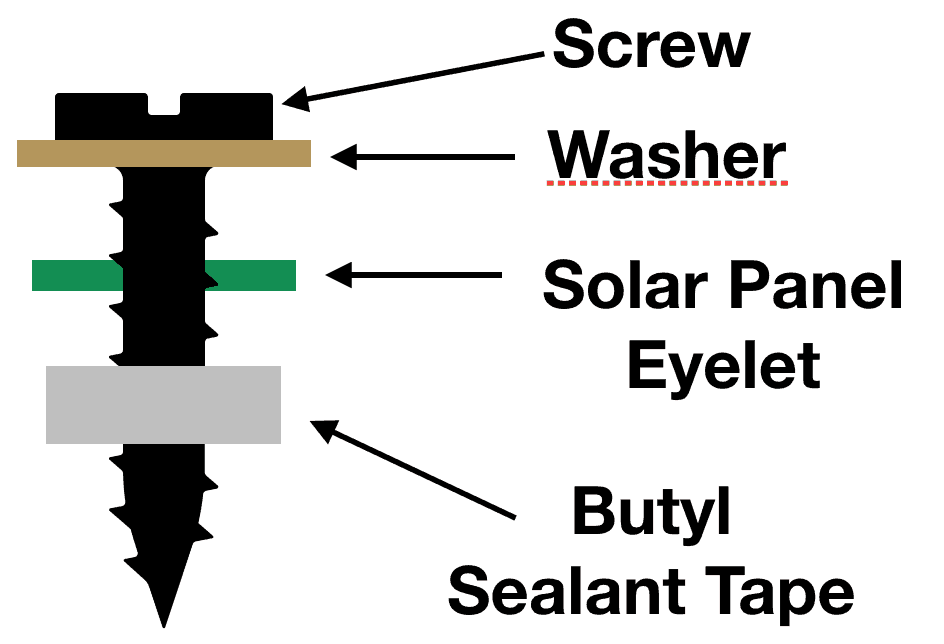
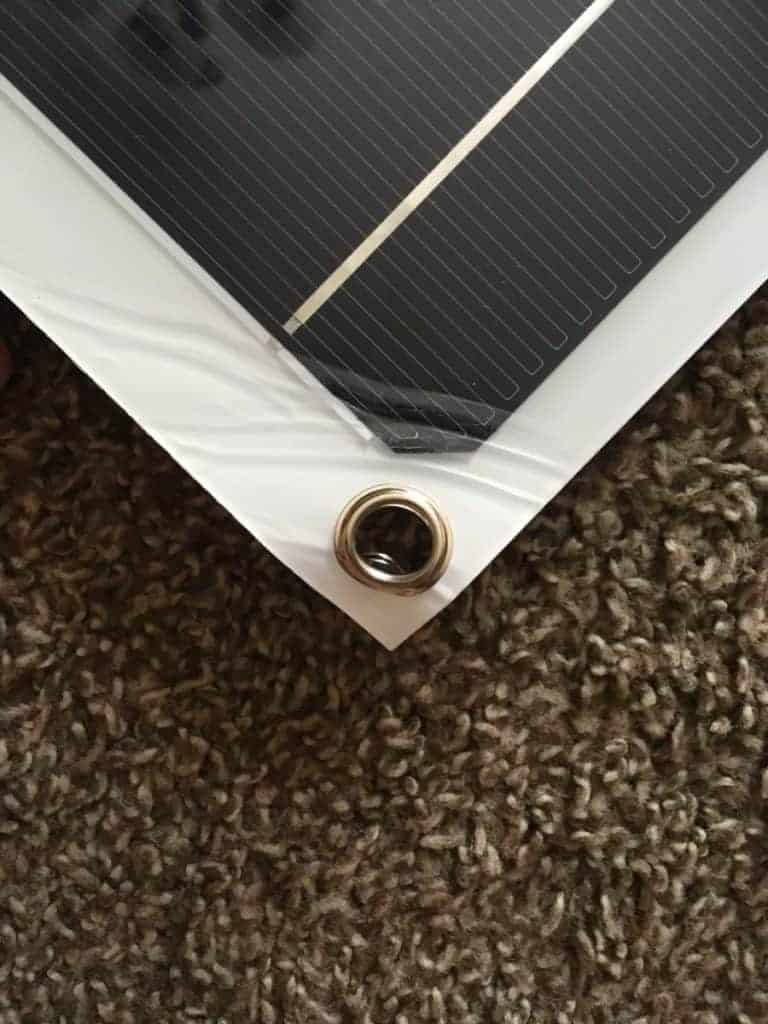
We used pan head screws, oversized washers and butyl sealing tape to secure the panels to the RV roof through the 6 eyelet holes. The butyl tape (Amazon link) was put between the washer and the roof to ensure there was a watertight seal.
Once the panels were securely screwed down we used self levelling lap sealant (Amazon link) around the outside of the panels and overall the screw heads. This maintained a weatherproof seal preventing any water or moisture from getting under the panels and leaking through the roof.
Routing Solar Panel Wires
**do not connect the wiring to the panels until all the wiring is routed and the electrical connections are made at the charge controller**.
The panels can be wired together in a series or parallel configuration using the factory MC4 connectors. MC4 connectors typically come standard on the wiring of commercial solar panels. They are positive locking which prevents them from accidentally coming apart and they are also water and weather resistant.
If you are choosing to wire your panels in series you can simply plug one connector into the next and install male and female connectors onto the long wiring running to the charge controller.

If you are wiring your solar array in parallel then using some MC4 “Y” connectors or branch connectors is a simple solution. Simply run all the positive wires into the “Y” connectors. From there you will need to install the male and female MC4 connectors to the long wires going to your solar charge controller.
To minimize power loss larger gauge wire is best but it can also be harder to bend, strip and crimp as it gets larger so it should be sized to the system being installed.
For our installation we used two #8 American Wire Gauge (8 AWG) copper wire conductors, one red and one black protected with wire loom, a black plastic cover used to protect automotive wiring harnesses.
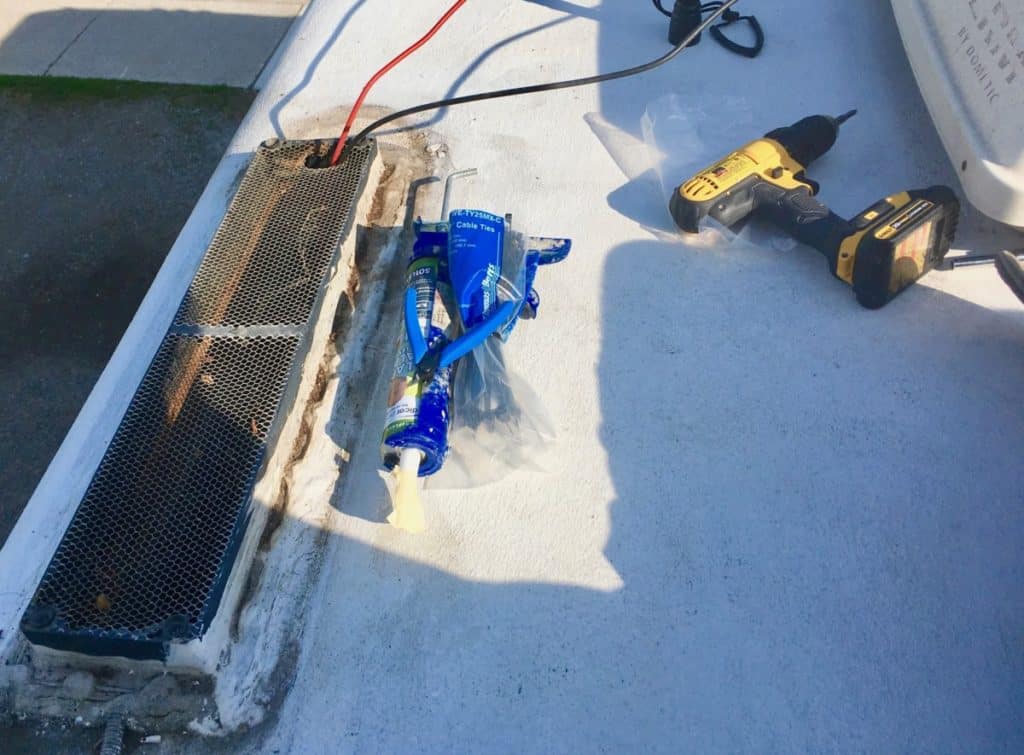
Select a straight routing path for the solar panel wiring along the RV roof to the fridge vent. Before securing anything down you should give the surfaces along the route a thorough cleaning to ensure proper adhesion of the sealant around the panels and over any screw heads.
We used adhesive cable tie bases with screw holes (Amazon link) through the center and butyl sealing tape under the screw head. To help with weather seal put some of the self-levelling lap sealant around the base and over the screw head.
Getting Wire Down From The RV Roof
The RV fridge vent is an ideal corridor from the roof down to the undercarriage of an RV. The vent cover is secured by a few screws making it easy to remove. Once removed, route the wiring through the mesh covering protecting it with electrical tape and leaving a small slack loop. Be sure to re-secure the vent cover properly once finished.
There was a cabinet separating our fridge from the floor requiring us to drill only two new holes along the vertical run from the roof to the undercarriage.
Be sure to perform a thorough check on both sides of any surface you are drilling through to avoid damaging components that may be hiding on the backsides of surfaces.
Leave the wiring unsecured until it is routed all the way from the panels to charge controller. Refrain from cutting off any extra until all the wiring is secured, it is always easier to shorten wiring than lengthen it.
Once through the floor of the rig, The wire should be protected with wire loom and routed along the frame rails avoiding any possible pinch points along the way. Choose the safest path to avoid any possible damage to the wire while being as direct as possible to limit the wire length.
Connecting To The Solar Charge Controller
The wire needs to reach the location of the solar charge controller which is ideally located as close to the batteries as possible. Locating the charge controller close to the battery is best because it will reduce any voltage loss in the wiring.
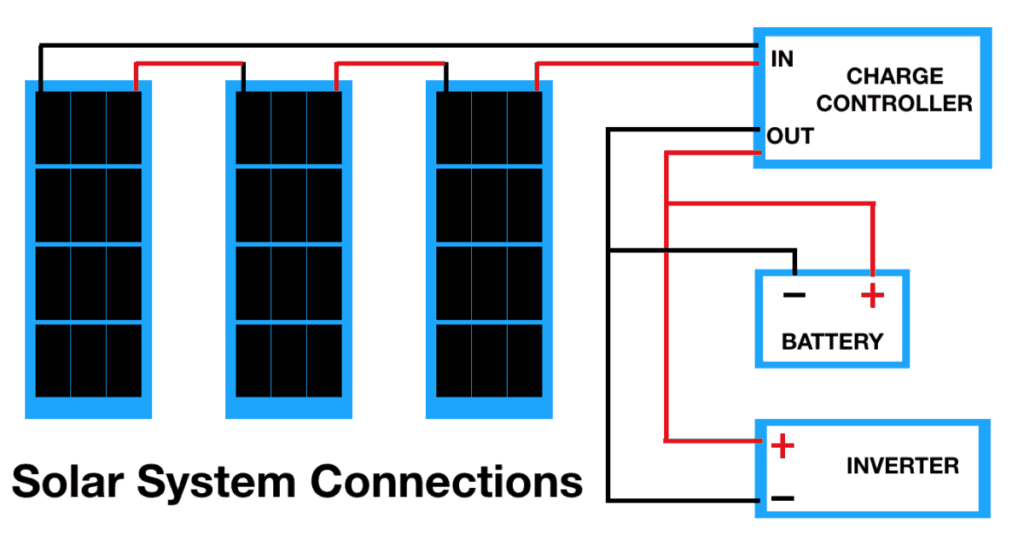
Once the solar charge controller is installed in its final location connect the wiring coming from the solar panel to the input terminals of the charge controller. The terminals will be marked with the words “Input”, “From Panels”, or oftentimes just have a small picture of a solar panel pointing to them. Be aware of the polarity of the terminals and connect the red wire from the solar panels to the “+” terminal and the black wire to the “-” terminal.
After connecting the input wiring, connect the output wiring of the charge controller to the battery terminal wiring. I connected my charge controller to the input of the inverter which connects directly t the batteries. It was the shortest path and allowed me to use the large gauge wiring between the batteries and the inverter to also carry the charge to the batteries.
Connecting The Solar Panels To The System
The final connections to make are in the RV solar system are joining the solar panels to the rest of the circuit. Up to this point there has been no current flowing in the circuit keeping safe while routing and terminating the cables.
Install the proper MC4 connectors to the cables and plug the negative or black wire in first followed by the positive cable. If sun is hitting the solar panels you should be able to read the input voltage and current on the display screen of the charge controller.
The RV Solar System Advantage
You now have energy independence and will be able to relax in the most remote camping locations for days on end. Having solar panels on the roof of an RV is an eco friendly way to immerse yourself in the outdoors without the tether of an electrical cord or hum of a generator.
Enjoy the peace and beauty without being left in the dark!
