This post contains affiliate links.
Revamping your RV can really make your tiny space feel like home. And while there are many different facets to an RV reno, one that can really be a pain in the neck (pun intended) is the ceiling. During our RV renovation journey, I searched high and low to find all the different options out there for redoing our RV’s ceiling.

Before starting your ceiling reno you’ll want to make sure your RVs roof is in good shape. Dark patches on the existing ceiling are telltale signs of water damage. Make sure that everything is properly sealed and any leaks plugged before installing your new, beautiful ceiling.

Table of Contents
1) Tin Ceiling Tiles
Tin ceiling tiles add character and warmth to a space. I have had a love of tin tiles for many years and they are a great option for an RV.
You can find both real tin tiles (Amazon link) and faux tin tiles. There are several materials for faux options including vinyl and foam.
Real tin and vinyl tiles have the benefit of being more durable than foam. Foam can be fragile and easily damaged but it is super lightweight. Actually, with how thin the tiles are, all of them are very lightweight.
Obviously, space is at a premium in an RV but tin tiles are very thin! Tin tiles are about 0.010″ thick, vinyl tiles are 0.013″ but foam tiles tend to be thicker around 3/32″ at the thinnest point. Definitely, a consideration when picking your product.
Tin tiles come in all kinds of different patterns and finishes. You can easily find something to suit your needs and customize your space to your taste.
Tiles usually come in 24″ x 24″ size, though some can be larger at 24″ x 48″ or even have European sizing at 20″ x 20″. Just make sure you are fully aware of the size of tile when you order them.
Installation is pretty straight forward. Most can be glued up and the manufacturer will usually recommend the type of glue to use.
Real tin can be more difficult to cut through since you will need tin snips and gloves to protect yourself. Vinyl and foam can be cut with a sharp knife or scissors.
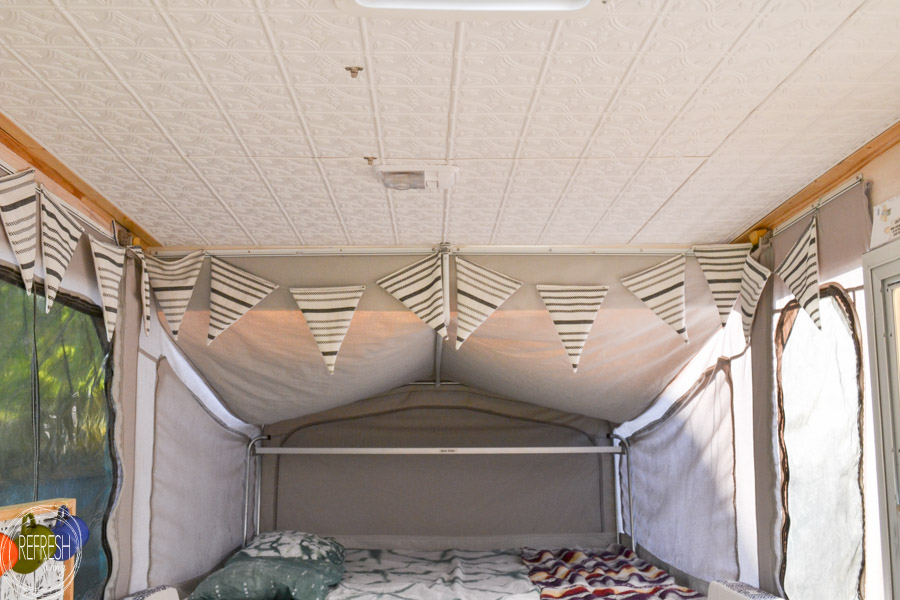
Jenny at Refresh Living did a beautiful job installing faux tin tiles (vinyl) on her pop up camper.
2) Foam Planks
One unique product I found was foam ceiling tiles. I stumbled across these when I was looking at tin tile options.
Foam planks have the benefit of being extremely lightweight and were pretty thin too about 3mm (less than 1/8″). They also provide some insulation and sound deadening. Unfortunately, as with the faux tin, the foam planks are fairly fragile but ceilings are relatively low traffic areas.
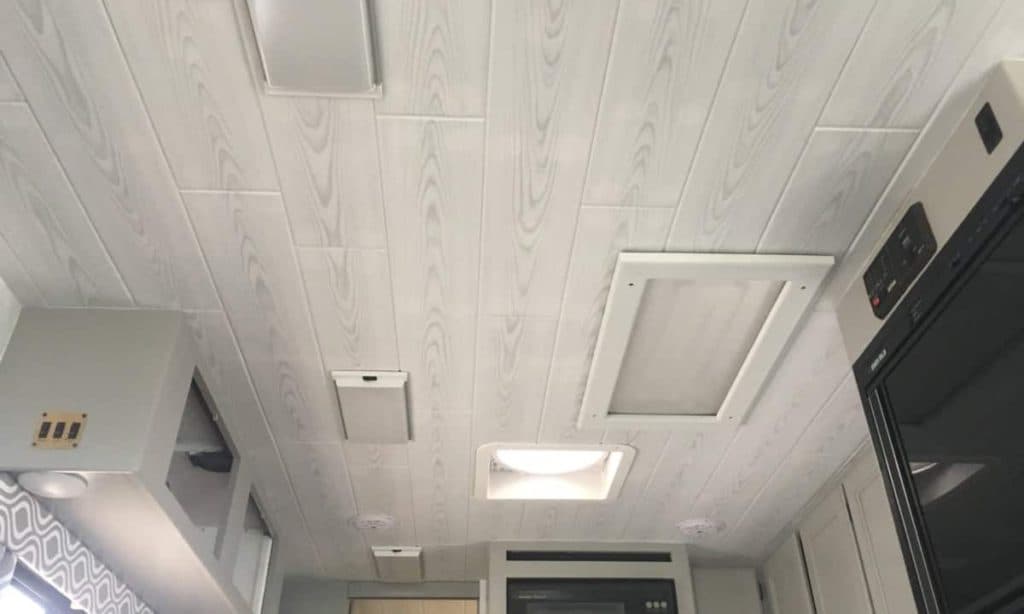
The planks I found had a wood grain look, coming in either silver birch or pine finish. The planks themselves were 39″ by 6.5″.
Installation is again very easy, tiles can be cut with a sharp utility knife or even scissors. The manufacturer recommends using a ceramic tile adhesive like AcryPro to glue up the planks.
*Spoiler Alert* we ended up using these in our RV! Check out how we did it in my article: Easy Lightweight Ceiling Update
We are super happy with how our ceiling turned out. It’s modern, bright, and was a cinch to install.
3) Tongue and Groove
Tongue and groove ceilings are one of my all-time favorite ceiling finishes. They just make a space feel warm and inviting.
Using real wood in an RV can make your space feel very homey but there are some downsides. Wood can be heavier and thicker when compared to other mediums available. Boards tend to be at least 5/16″ thick.
You will have to finish your wood but that does allow you to customize it to your style. Staining and painting can be done before you install your ceiling.
Tongue and groove has several styles as well. There is a V groove which is a smooth board that has a slightly angled edge which makes a V when connected. And Beadboard, which has a double groove down the center and at the edge to hide the seam.
Another drawback to wood is it is susceptible to moisture. Wood loves to warp and twist in moist environments so proper installation is key to preventing this.
Speaking of installation, how you do this is really going to depend on your RVs structure. Normally furring strips are nailed to the surface then the tongue and groove boards are installed by nailing through the tongue of one board into a furring strip.
This may not be possible in an RV but you should be able to install it using glue. You probably will need to use some sort of nail or support while the glue sets to keep it together.
If you are redoing the ceiling and have to repair water damage, tongue and groove might be a great option since you can install the right type of subsurface, reinsulate and the boards will help beef everything up.
4) Shiplap
Shiplap is extremely popular right now! Everyone, myself included, loves the farmhouse look and shiplap is a great way to bring that look to an RV.
While similar to tongue and groove ship ap is installed a little differently but it does have some of the same concerns.
It’s going to be heavier and thicker than tongue and groove due to the nature of the joint. A typical shiplap panel from the hardware store will be about 9/16″ thick.
As an alternative, you can do faux shiplap by cutting some 1/4″ plywood into strips and gluing or nailing them to your ceiling with a small space between.


5) Wood Panels
Wood panels can come in all sorts of decorative patterns and options. One popular option, usually used on walls, is wainscotting.
Panels will be lighter weight than real wood planks since they are thinner, around 3/16″. They are typically made from hardboard which is resistant to warping.
Panels will be a little harder to finagle into place in your RV. Cutting some pattern pieces is one way to reduce the amount of time you need to hold the panel above your head to get a good fit.
You’ll need to support the board while your glue is drying. Brad nails can be a handy way to do this but you’ll have to go back over the nail holes with filler.
6) Fabric
There are a couple of ways you can use fabric on your ceiling. One would be to flat mount it and the other would be to drape it.
Draping will provide a soft feel and give you all kinds of cool texture. You’ll want to you a light weight fabric like tulle or cotton, then you can tack it to your ceiling using nails or upholstery tacks.
It might be tricky to drape your fabric around your light fixture, ceiling vents, and air conditioner but it’s not impossible.
The other option would be to flat mount it with a spray adhesive. Working with a fabric that is a little sturdier, like a vinyl, will make it easier to install. Also picking a fabric that doesn’t fray makes it easier since you don’t have to worry about finishing your edges.
I think fabric has a few drawbacks compared to some of the other mediums. It is more prone to absorbing smells, and since it is an RV it’s hard to keep your cooking odors in the kitchen. If you pick a woven fabric like cotton or linen vs a vinyl it’s much harder to clean.
The couple over at Thriving in Tie Dye took it to the next level by stapling pattern tapestries to their ceiling and finishing it off with some white trim!
7) Murals
I personally love the idea of putting a mural over the bed. I can’t think of a spot better suited for a ceiling mural than a place where you are meant to be looking up.
A mural will probably need to be used with another ceiling refinishing option, like paint, otherwise, it’ll overpower your RV. But strategically using one can be an awesome way to make a big impact.
If you are an extremely skilled painter and want to be like Michelangelo and spend forever on your back, then you could paint your mural on your ceiling. Otherwise, there are premade options out there for you.
Using a site like Muraledesign.com you can pick a mural from any of their 100’s of designs and have it made to a custom size. You can even upload one of your own photos!
Murals from Murale Design are self-adhesive and don’t need any type of glue. They must be installed on a clean painted surface. They are actually made of vinyl, not paper so can be used in high moisture areas. If you plan on wintering anywhere its best to let them know so that can use a different adhesive.
8) Vinyl Flooring
There are a million and one options out there for options for your floor so why not put it on your ceiling? Since there is no traffic on a ceiling you can pick the really thin flooring options.
This will keep the planks or tiles as light as possible. You’ll also want to pick a flooring that made to be glued down not floating.
If you choose a peel-n-stick tile option I’d still use another heavy duty glue. Peel-n-stick adhesive isn’t always the best quality and you don’t want your ceiling falling on your head!
You’ll notice I said planks, while you could use a vinyl sheet it would be difficult to hold it on the ceiling while the glue sets. The vinyl sheet flooring I’ve used in the past tends to be pretty floppy so it would be hard to work with.
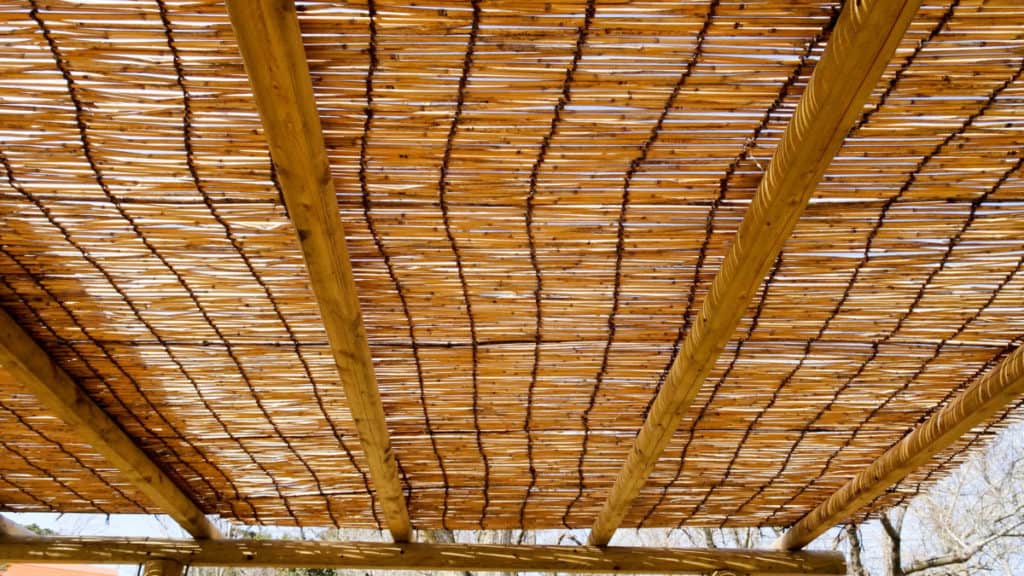
9) Bamboo Grass
This is an idea that intrigued me. It would give your RV a tiki hut feel to it and hey who doesn’t love a tiki hut.
There are a couple of ways you could go about this. The first would be to take a bamboo grass fence and glue it to your ceiling. Unfortunately, it’ll be a bit thick since bamboo for fencing tends to have a 3/4″ diameter.
The next option would be to buy bamboo slats. These would normally be used to finish a bar. They are only 1/8″ thick but also only 1-3/4″ wide so you’ll need a lot of them to cover your ceiling.
A third option, which seems the best to me, is bamboo paneling (Amazon link). It’s more like a combination of the bamboo fence and the bamboo strips but is only 1/16″ thick.
All these would be installed using a heavy duty glue or liquid nails. You probably still need to prep the surface since it will peek through in spots.
10) Wallpaper
I personally have a love/hate relationship with wallpaper. I love the way modern wallpaper looks but I have spent hours ripping the wallpaper off the walls of my RV!
There are so many amazing and different options available in wallpaper (Amazon link) these days. You can pick a subtle pattern or a bold print or if you just want to add some texture then you can pick a paintable option.
Wallpaper on the ceiling follows the same principles as hanging it on a wall. You’ll need wallpaper glue and it’s a good idea to use a wallpaper primer on the ceiling first.
This is really a two person job, one to do the gluing, the other to support the extra wallpaper so it doesn’t pull down the section your just put up.
11) Laminate Sheet
After doing our RV counter renovation (check it out!) I had an epiphany! What if I put laminate counter on the ceiling? Just hear me out.
You can purchase laminate sheets from the hardware store very inexpensively, around $50 for a 4’x8′ sheet. They are extremely thin, like 1/32″, and very sturdy.
It would be a bit of a pain to cut to size and the contact cement may not be the best option for adhesive in this case. But there are quite a few different colors and patterns to choose from plus it’s water resistant and easy to clean.
12) Tissue Paper
Tissue paper is an easy but time-consuming way to add some texture to your ceiling. Since you are adding texture it doesn’t matter if your ceiling is in perfect shape.
You will need to buy a bunch of tissue paper though and spend some time tearing off your square edges. It’s basically glued up using paint.
Since you will be painting it you have the option of using whatever color your heart desires. I mean this for the paint color but its also true for the tissue.
You could use this as an opportunity to use all those piles of tissue paper that add up after the holidays!
You can find an in depth tutorial on how to do this over at the Magic brush Inc.
13) Paint
While paint itself isn’t a unique idea there are so many techniques you can use to spice up your ceiling. Techniques such as sponging or rag rolling can add dimension to your ceiling without adding any physical depth. Even using a textured roller can be a simple alternative.
Paint can be time-consuming though, you’ll need to properly prep your surface first. Paint is a lot more sensitive to imperfections in the ceiling surface. Patching any holes, sanding and degreasing will make painting go a lot smoother.
It’s also a good idea to prime your first especially if you’ve had to patch holes or your surface was previously unfinished
Fix It Yourself RV Maintenance Course
The most costly parts of RV ownership are repairs and maintenance. That’s why I recommend learning to do your own RV repair and maintenance.
The Fix It Yourself RV Maintenance Course is the perfect way to learn how to do the most common repairs and maintenance on your RV. A Certified RV Technician wrote and filmed the course so you know the information is actually correct.
Plus it’s downloadable so you can access it from anywhere, even when boondocking in the middle of nowhere with no service.
Find out more about the best RV Maintenance and Repair Course available!

Ceiling Accessories
Whew, that’s a lot of ideas for how you can revamp your RV’s ceiling. Once you bite the bullet and decided on your plan of action there are a couple of other things to remember when you start your update. If you forget these things all your hard work will be undermined by a few glaring issues.
Vent Trim – You’ll want these to coordinate with your beautiful new ceiling. You can buy new ones off Amazon or spray paint them. Spray paint is great since you can choose a color that either accents your ceiling or blends in.
A/C Cover – Our A/C cover was horribly yellowed with age. The A/C itself works like a champ but it was a dirty yellow color. We took the cover off, removed all the louvers and filters, taped off the control panel and spray painted it white. Now it looks like new
Light Fixtures – Now is the time to update those lights. If you can sub them out for LED fixtures to drastically reduce your energy costs. We chose to salvage our existing fixtures by ripping out the innards, replacing them with LEDs and spray painting the plastic white. See how we upgraded our LED lights on our article How To Change RV Lights To LEDs.
RV Ceiling Remodeling Products
No products found.
