This post contains affiliate links.
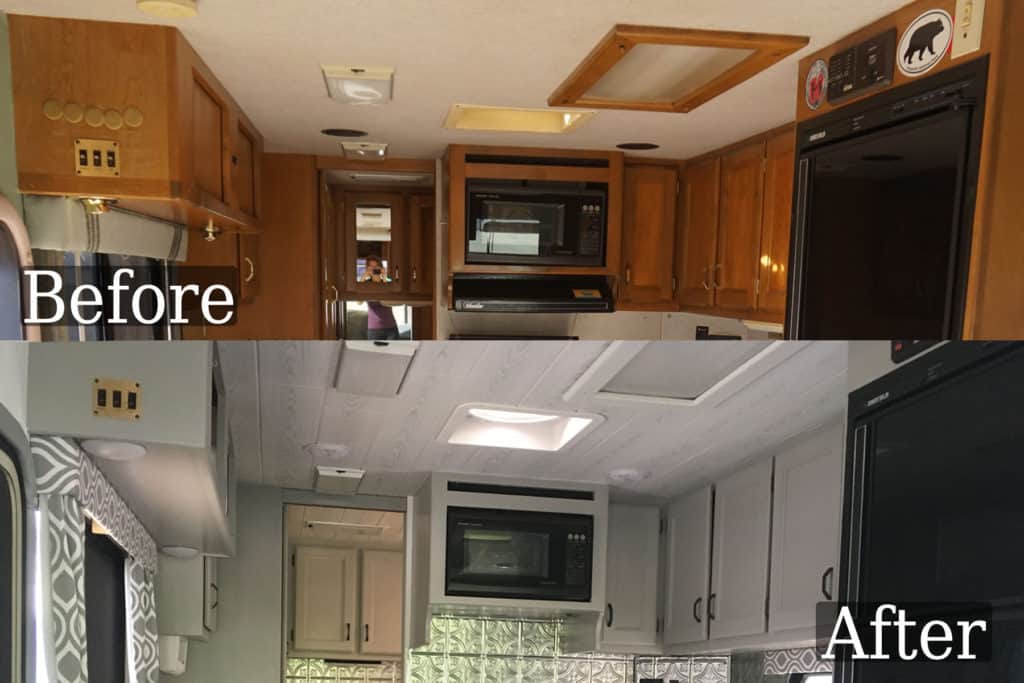
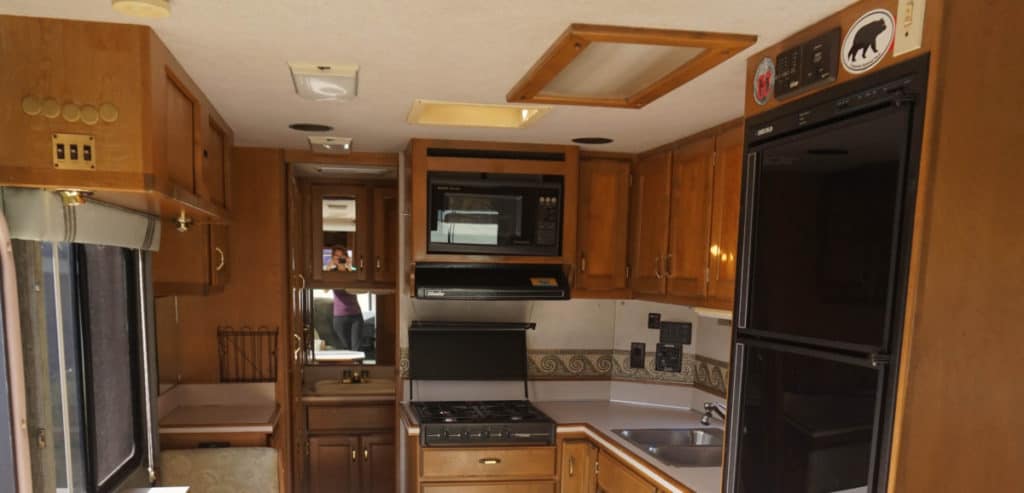
When we purchased our 1994 RV the ceiling was the original builder grade carpet. Yes, you heard right ceiling carpet. We knew we needed to redo our RV ceiling with a lightweight, easy to install option that looked high end.
Foam ceiling planks are a great option to update your RV ceiling. They are lightweight, easy to cut, easy to install and hide all the imperfections on your RV’s ceiling.
After scouring the internet for a lightweight, easy to use option, that would hide a multitude of sins I stumbled upon Antique Ceilings and found their Silver Birch Finish Plank Foam Ceiling Tiles. I’ll go over why we picked this product, the steps we went through to tear down the old carpet, and install our new fabulous ceiling as well as a few things I would do differently.

Table of Contents
Picking a Material for an RV Ceiling
As I mentioned I spent a lot of time researching what different options there were for updating the ceiling in our RV. We didn’t want to add much weight to the rig and knew we needed something to cover all the glue residue left behind by the carpet. We also wanted something fresh and modern to keep the small space feeling bright and open.
You can see all the materials we used on our page The Best RV Renovation Materials.
There were a few options that we looked at before settling on the foam ceiling planks.
Option 1: Particle Board
The first idea was to use thin particle boards then glue and nail them to the existing ceiling structure. We quickly poo-pooed this idea since it would involve a lot of cutting awkward shapes around the cabinets.
We’ve done this sort of install before in the bathroom of a brick and mortar house and it was a pain. The white particle board chips easily when cut, and the nails or staples tend to go all the way through the board.
Also, We would need to install trim along the walls and cabinets. Overall it seemed like more work than it was worth. So we crossed it off the list.
Option 2: Paint
While certainly an inexpensive option, paint is always labor intensive. We would have needed to do a substantial amount of prep work to give the ceiling a smooth finish or else create a textured effect to hide the issues.
There was a lot of residue left behind by the carpet glue that would have required sanding, all the gaps between the existing ceiling panels would need to be filled as well as any staple holes. There was also a hole we needed to patch where the antenna crank handle came down, but the handle was broken and we figured we didn’t need a TV antenna anyways.
Paint was our back up option if we couldn’t find a better solution but I REALLY didn’t want to paint the ceiling. It would be literally a pain in the neck.


Option 3: Fabric or Wallpaper
This option was only briefly entertained as it seemed like it would be very difficult to get a smooth finish. Ending up with a finished ceiling that we weren’t happy with just was not an option.
Option 4: Ceiling Tile
I started off looking at tin ceiling tiles but I was afraid that they would be too busy for the space and make it feel smaller.
I knew we needed to stick with a light and airy feel since we have a small RV. I eventually ended up on the Antique Ceilings website whose tagline is “Sophisticated Alternative to Tin”.
They had several options, some were very similar to a tin tile look which didn’t help with the less busy idea. Then I found their wood plank style tiles and they just seemed perfect.
The company carries both a pine look and a silver birch look plank. Since our RV is mostly grey tones the silver birch fit the bill. Speaking of bills, overall the cost the ceiling tiles came to about $0.82 per square foot plus the cost of the glue.
If you are looking for more ideas on how to upgrade your camper ceiling see my article Ideas to Update Your RV Ceiling.
Removing the Old Ceiling
If you’ve ever removed carpet from a floor then you know how dusty and dirty it can be. Now picture all that happening above your head.
We had already gutted the inside of our RV which made the process much easier. I highly recommend the first step of ANY renovation project be to remove everything that isn’t bolted down out of the space and then unbolt and remove anything else.
We armed ourselves with dust masks, safety glasses, gloves, and sharp utility knives. The light fixtures, vent trim, air conditioner cover, smoke detector, and carbon monoxide detector were all removed and set aside for their own updating,
To start off, we ran the knife all along the edges of the ceiling and around the cabinets. Like most RV’s the ceiling carpet was installed prior to anything, even the cabinets and walls, so we ended up leaving the carpet alone in the cabinets and closet.
We made a starting point at the center roof vent and cut the carpet to the edges. Once we could get our good grip on the carpet it came down fairly easily. There were already some areas where the carpet was sagging but the places that were still secured, the glue stuck pretty well.

Using the carpet itself as leverage really helped to pull it down quickly. In the small spaces, like the bathroom, it was a little more difficult to get the right angle and leverage.
Overall it only took a couple of hours to tear down the carpet and clean up the leftover particles along the edged, leaving us with an equally ugly but less fuzzy ceiling.
Installing the Ceiling Planks
Of all the renovation projects I’ve done over the years, this has to be one of the easiest ones I’ve ever done.
We started by measuring the width of our RV ceiling to see if we would end up with a weird skinny row on the side. Fortunately, we didn’t have an issue but it’s always important to check just like flooring. If we had, we would have needed cut the first row widthwise to even out the skinny last row.
For this project, we only needed a few tools, most we already had on hand and anything we didn’t we got from Amazon or our local hardware store
- tape measure (Amazon Link) use a quality tape measure with small graduations for better accuracy
- chalk line (Amazon Link) easy way to mark where your first plank will go
- utility knife (Amazon Link) just make sure you have a sharp new blade
- ceramic tile adhesive (Amazon Link) AcrylPro was recommended to glue the tiles to the ceiling by the manufacturer but any tile adhesive should work
- straight edge (Amazon Link) a basic carpenter square will help you make the straightest cuts
- paper towel – to clean up excess glue
- plastic spoon – to dollop on your glue

We laid out the first few planks to make sure we didn’t have any with the same pattern next to each other. Like any faux wood product, the planks will have repeat patterns and it’s important to not have those right next to each other for visual appeal. We also ensured our “grain” lines were always following the same direction but that’s just personal preference.
Before laying our first tile we did give the ceiling a quick wipe down with soap and water to remove and lose bits and residue. Once that dried we were prepared to start laying the first plank.
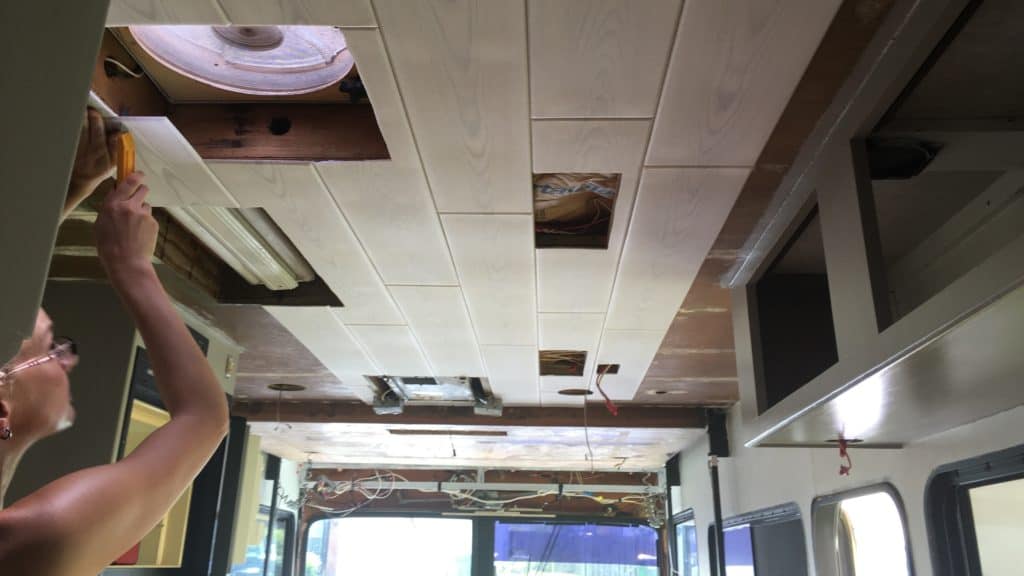
We chose to start in the middle of the ceiling and work our way out. We measured from the wall and the cabinets and then used our chalk line to snap a line all the way down the center of the RV. We lined the edge of our first row up with the chalk line and start gluing.
We used the plastic spoon to dollop the glue on the back of the planks in quarter sized blobs about 1/2 an inch thick. The blobs were placed in each of the four corners and several places along the plank. We weren’t overly careful about even spacing.
Once the glue was applied we gently pressed the plank to the ceiling making sure all the blobs had adhered. We continued along with the planks like this till the end of the row.
At the end of the row, the plank was cut to fit the nooks and crannies of the cabinets and tested to check for fit. Then we started on the next row making sure to tightly fit the planks next to each other and properly space out the seams.
When we ran into an opening in the ceiling such as lights or roof vents, we made sure there was glue around the opening and installed the plank. With the plank installed it was very easy to run the knife around the inside of the opening and get an exact fit.
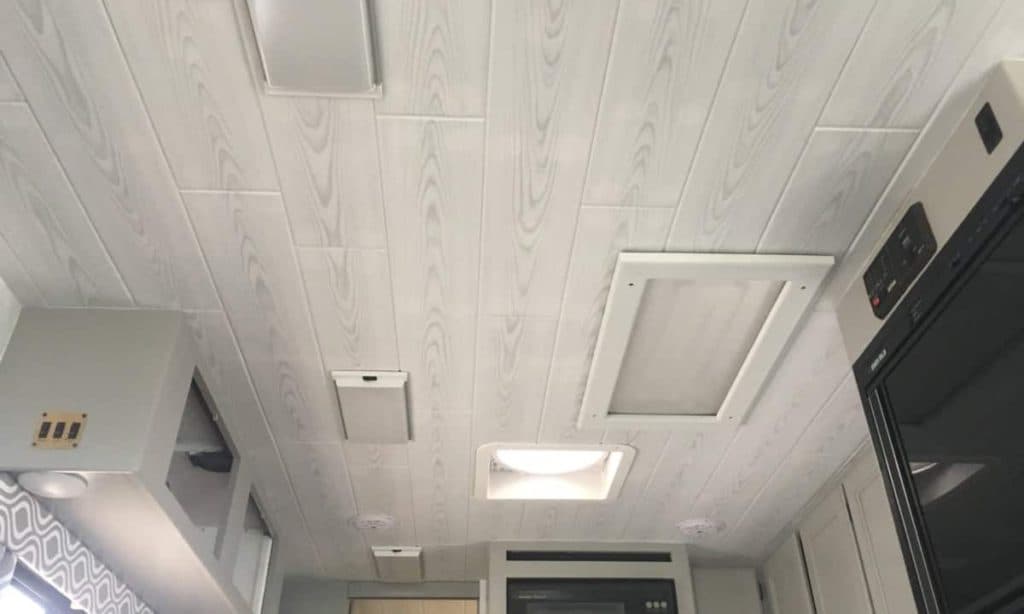
We were able to fully install the ceiling in a couple of hours. Once the glue was dry, we caulked all along the edges and between the planks.
The Final Product and Take Aways
The ceiling turned out fabulously! I’m really happy with how it looks overall, how inexpensive and easy it was to install. However, there were a few things I would consider in the future.
- The ceiling is very fragile. Think of a styrofoam plate and that’s basically what the planks are made of. As a ceiling, it really doesn’t see much wear and tear but RV ceilings are typically lower than the average house so we have found ourselves smacking our hands into it when getting changed. We also had some damage occur during the renovation process just from moving things in and out of the RV.
- I did go to the trouble of patching holes and gaps in the ceiling prior to us deciding on using the foam planks and that was not necessary.
- If I did it again I would put a coat of white primer on the ceiling before installing the planks. You can see, if you are looking for it, the glue blobs on the planks. I think if the subceiling had been white they would have been less noticeable.
- If the subceiling had been painted we wouldn’t have bothered with caulking between all the planks, aside from in the bathroom.
We also renovated the bathroom and kitchen in our RV. See how we took Our RV Kitchen from Drab to Fab on a Budget and Our RV Bathroom Reno: Big Makeover On A Little Budget.
Related Questions:
Can I update my RV lights to LEDs? Many light fixtures can be easily changed to LEDs by just swapping out the bulbs. Others may need to be fully replaced or a DIY change over is required. Learn to DIY in our article How to Change RV Lights to LEDs.
Fix It Yourself RV Maintenance Course
The most costly parts of RV ownership are repairs and maintenance. That’s why I recommend learning to do your own RV repair and maintenance.
The Fix It Yourself RV Maintenance Course is the perfect way to learn how to do the most common repairs and maintenance on your RV. A Certified RV Technician wrote and filmed the course so you know the information is actually correct.
Plus it’s downloadable so you can access it from anywhere, even when boondocking in the middle of nowhere with no service.
Find out more about the best RV Maintenance and Repair Course available!