This post contains affiliate links.
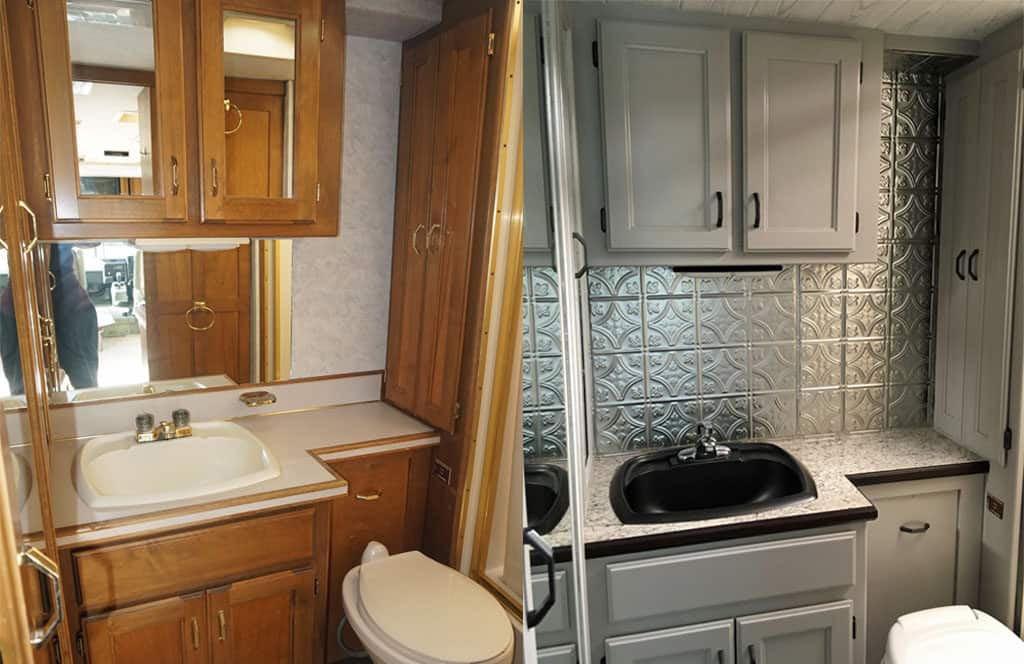
The bathroom of our RV was the original dated disaster full of mirrors and brass. Luckily for us, the quality workmanship of the cabinets meant the bulk of the work was going to be cosmetic updates which saved us a ton of time and money.
The basic steps for updating our RV Bathroom were:
- Tear It Out – remove everything out of your space before starting
- Paint – prep, prime then paint
- Ceiling – install your chosen ceiling update
- Flooring – install your chosen flooring
- Light Fixtures – repair or replace your light fixtures
- Counters – install new or refurbished counters
- Backsplash – install your chosen back splash
- Hardware – paint or replace hardware and reinstall doors
- Fixtures – install new fixtures
- Admire – check out your awesome new bathroom
The layout was well designed with plenty of storage space to house our medicine cabinet regulars, dirty laundry and a large closet avoiding the necessity to do any costly remodeling in our 30sqft space. Since the bones of the space were solid we decided to reuse as much as we could and spruce up the rest to save money.
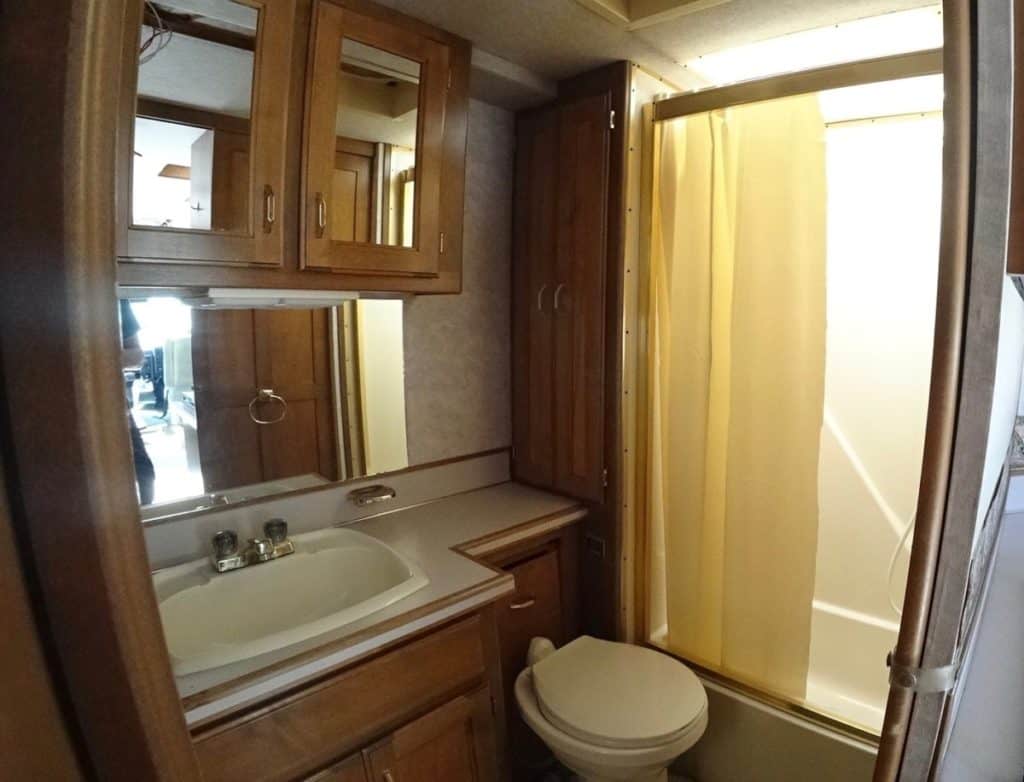
Table of Contents
1) Tear It Out
Our demo started with removing all the cabinet doors and tagging them so we would easily know where they came from. We bagged up the hinges, handles, and any other hardware. We weren’t 100% sure what, if any of it, we were going to be reusing.
Next, we removed the metal trim around the shower frame. The frame of the old shower door was still in place but there was no door to speak of so that was unscrewed and went in the trash.
All the light fixtures were removed as was the trim around the ceiling vent. Our vent fan wasn’t working properly either but we didn’t put this out right away since we weren’t ready with a new one yet.
In an ideal world, we would have done the vent swap before we finished demoing but we didn’t. We installed a new vent after the bulk of the reno was done which just meant more clean up for us.
No products found.
The toilet, sink, and shower were all an almond off white color. I’m not sure if they were originally this color or if they had yellowed with age. The toilet got pulled and chucked, it seemed like too much work and also kind of gross to refinish it.
All the faucets were poor quality plastic and their peeling faux brass facade made them perfect for the dumpster.
The sink we set aside for the time being, we weren’t sure if it was salvageable or if we needed to replace it but it was safer to keep it for now. The shower we didn’t touch aside from removing all the hardware and trim and peeling off the green anti-slip circles from the bottom.

Fix It Yourself is a self-guided online course where certified RV tech Ed Wilcox walks you through all the steps you need to know to properly maintain your rig and fix problems when they come up. Check it out HERE!
Next was the ceiling carpet, it was an off pink color with several suspicious looking stains. Once we could get a grip on it, we pulled it down fairly easily.
The peel-n-stick floor tile came up ridiculously easy but left a sticky, flip flop stealing residue behind. We didn’t do anything to try to remove the leftover adhesive and it gradually became less sticky as time went by.
I think the worst thing to remove was the wallpaper on the backsplash. The mirror came off easily with a little leverage, it was glued to the wallpaper behind.
The wallpaper itself took ages to peel off. It came off in little 1 inch chunks. I was ready to throw in the towel but the end of the process and it was only 3 square feet!
With the demo completed, we vacuumed up the debris and gave everything left a solid cleaning. I think the bathroom actually looked better torn apart than it did with the original finishings intact.
2) Paint
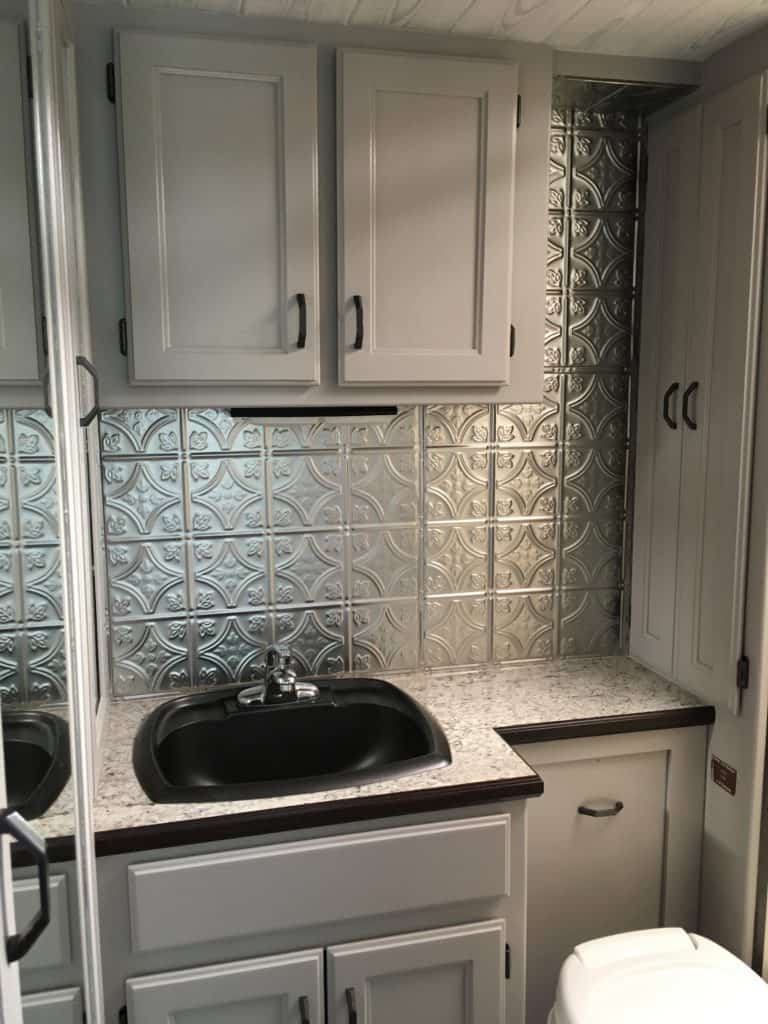
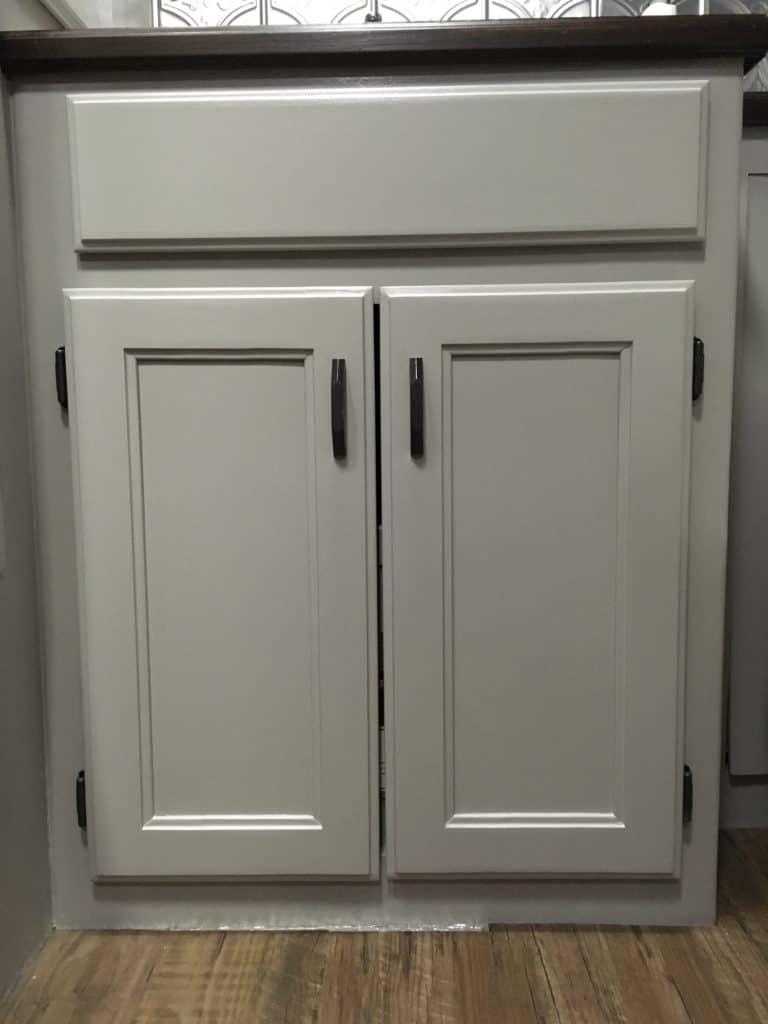
With our bathroom a clean slate it was time to get painting. We chose a light grey for all the cabinets in the RV to keep everything feeling spacious and bright.
We cleaned all of the cabinets and doors then degreased with TSP. We gave everything a light sanding before a thorough wipe down.
No products found.
We utilized a palm sander for the flat surfaces but spent a lot of time with rolled up sandpaper in the crevices and detail spots to ensure we’d get good adhesion with the paint.
We used Kilz primer for a first coat to seal the cabinets and prevent any bleed through of the wood. We also wanted to give our paint the best possible chance of lasting a long time.
Choosing a good quality paint was a must for us, though it cost a bit more. We went with BEHR Marquee in semi-gloss for our finish paint and though it’s a one coat guarantee we doubled down rolling on two quality coats.
We didn’t bother painting the backsplash or ceiling areas since they were going to be covered up but every other space was greyed over and the insides of the cabinets and closets were painted white.
The space was showing incredible promise after spending just $20 bucks in paint! For a detailed description of how we painted our cabinets, check out my article, Painting RV Cabinets: A Step by Step Guide with Tips.
3) Ceiling
We always had weight on our minds when it came to picking materials for the RV. We scoured the internet endlessly for our ceiling design ideas which led us to select a really cool foam ceiling tile from Antiqueceilings.com that had a wood plank appearance.
The foam planks were lightweight, easy to cut, easy to install, and hid all the imperfections. Similar to the paint, we maintained the flow of the same ceiling material throughout the RV. There was a lot of glue and fine fibers remaining from the old ceiling carpet so we decided against priming or paint it.
The foam planks were glued up using a ceramic tile glue in globs and then we used caulking in all the joints. I’ve put together a post that’ll give you an in-depth look at our Easy, Lightweight RV Ceiling Update.
In hindsight, the time consuming and neck numbing job of caulking it all could have been avoided if we’d painted the ceiling white before installing the planks. If we had to do it over again, a coat of paint would have been the easier way to go regardless of the rough ceiling surface.
There was only 8 sqft of surface space on the bathroom ceiling so it didn’t take much material. My favorite part of the foam is it’s waterproof so it covered the shower area too.
At only $2.16/sqft for the foam planks, it was an inexpensive and easy option for our ceiling. All in it cost us $22 worth of foam plank, glue, and caulking.
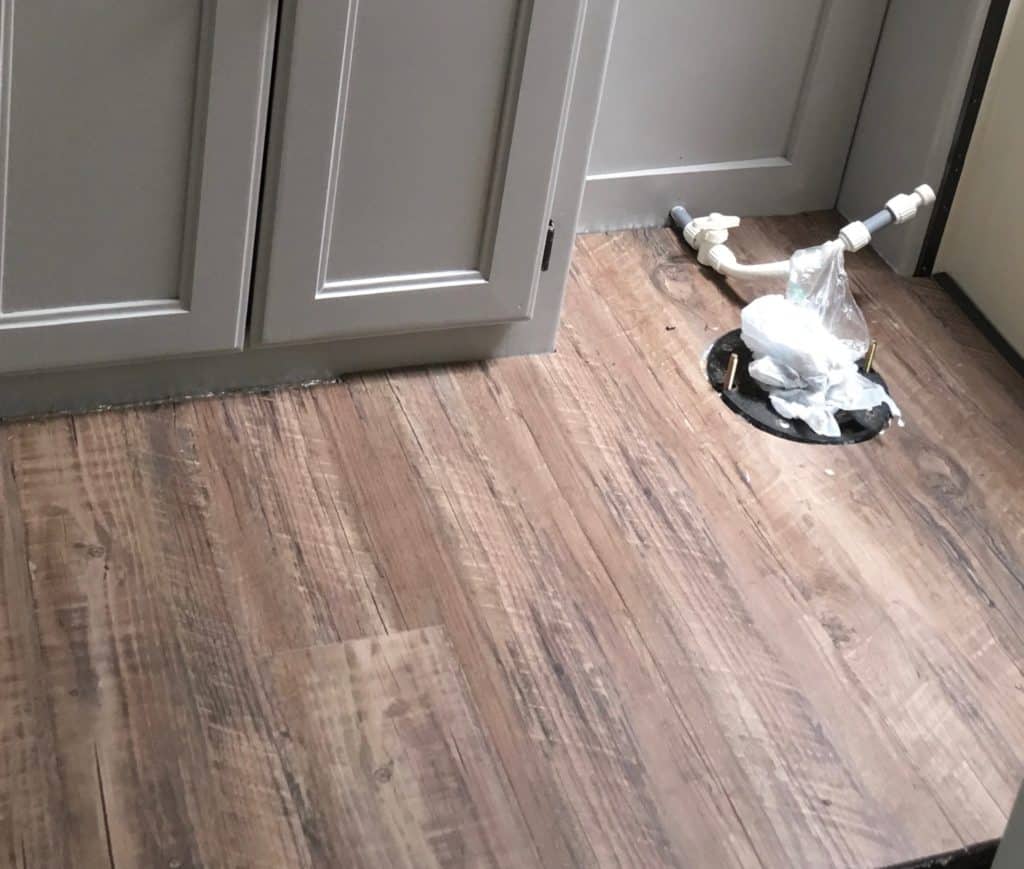
4) Flooring
One of my favorite parts of any renovation is floor shopping. There are so many gorgeous options in different materials and at different price points, it can be hard to narrow it down.
We wanted something durable, moisture resistant, inexpensive and easy to install. Vinyl plank flooring fit the bill and the budget.
I fell in love with a rustic, grey wood look that was a little bit more expensive than some of the options. I was able to convince my husband that $2.39/sqft was a small price to pay for flooring that would really pop.
We picked a click style, floating floor since they are super easy to install and so we could insulate below the vinyl.
Normally, vinyl needs some sort of underlay for cushion and soundproofing. We chose to insulate the entire RV floor with automotive insulation to give us not only soundproofing but also provide thermal insulation and a moisture barrier.
No products found.
The insulation was glued to the floor with spray adhesive, you can read about How to Insulate the Floor of Your RV in our blog post. Overall, the insulation was an easy and inexpensive install.
Once the insulation was installed it was just a matter of working our way from one end of the RV to another and attempt to randomize the plank layout so no similar patterns were too close.
For the tiny bathroom the insulation, flooring and glue add up to $55 smackers!
5) Light Fixtures
The bathroom lighting was a hodgepodge of yellowing plastic fluorescent and incandescent fixtures supplying inadequate lighting even for our small space.
We wanted to upgrade our fixtures to LEDs but the gaping hole in the ceiling was making it hard to find something that fit. We ended up gutting the florescent lights and Frankenstein-ing them into LEDs.
To start, all the insides were pulled out, then we spray painted the yellow plastic white to give it a fresh look. Next, we stuck down a few rows of LED tape lights and soldered them to the existing switch before reconnecting and reinstalling.
No products found.
The undercabinet lights were much easier and all we had to do was purchase the correct style of LED bulbs off Amazon. But I miscalculated when I reinstalled the fixture.
I had mistakenly assumed we wouldn’t be able to see the light fixture due to the cabinet trim and didn’t spray paint the fixture. You could easily see the unsightly yellow plastic.
Rather than uninstall it, I ended up grabbing some wide, black electrical tape and wrapped the edge of the fixture with it. Magically I had spruced up our light fixture. Looking back I’d have preferred to replace it.
No products found.
Our light fixture gut job only ran us about $5 though they did take a little time and you need a basic knowledge of soldering for this hack.
If you want details on how we converted our flight fixtures to LEDs read our article How to Change RV Lights to LEDs and watch our video below.
6) Counters
The vanity top was in good shape but it was not going to match our new modern, grey style. It was also an unconventional shape and taken up mostly with sink so trying to source a replacement top would have been tough.
We decided to use a new piece of laminate sheet and some trim at the edges to finish it off. Since we wanted to keep the design flow throughout the RV, we were able to use a single 4×8 sheet of laminate from our local hardware store for all our counters and even had a little to spare.
The bathroom counter was extra difficult since it was sandwiched between two walls. We had to carefully test fit the new laminate piece before gluing it down using contact cement.
No products found.
We used some 1-inch pine trim stained and clear coated to finish the edge of the counter. We used a dark stain we had leftover from another project and a semi-gloss clear coat.
A quarter sheet of laminate, an eighth of a can of contact cement and four feet of trim for the edge updated our ugly bathroom counter for just $25 all in. To learn how to install a laminate counter check out our article The Cheap Durable Way to Update Your RV Counter.
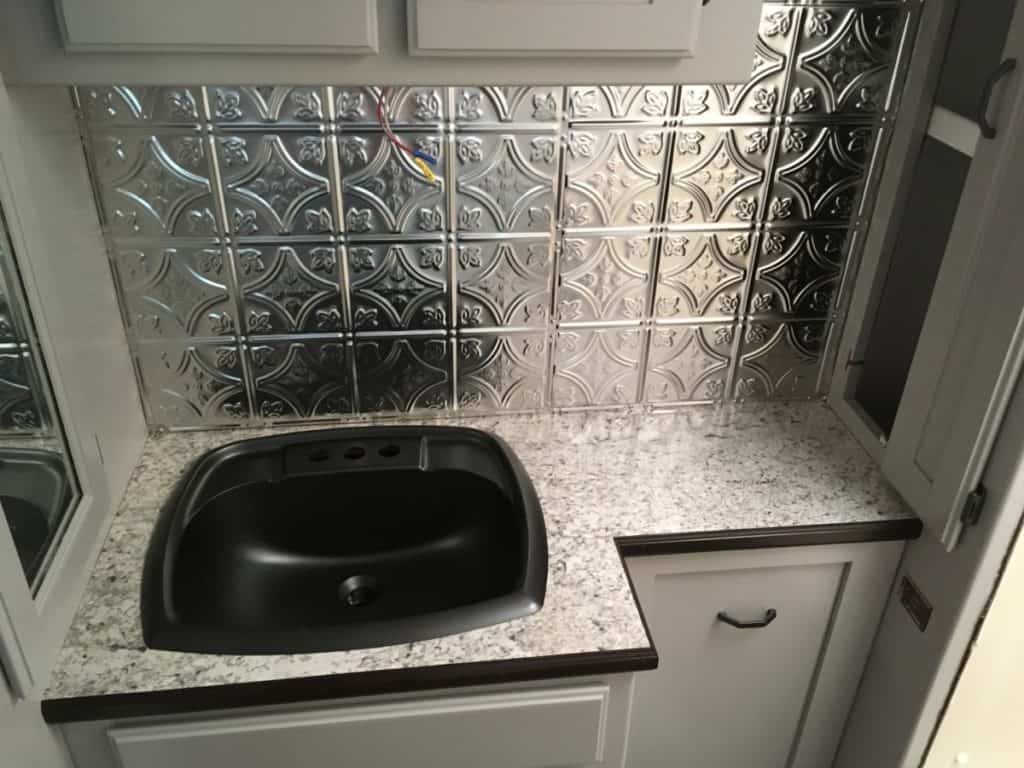
7) Backsplash
I had originally wanted to do a tin tile ceiling in the RV but we thought it might overpower our small space. The backsplash, however, was the ideal spot to use it.
We looked at a few options between real tin tile and faux tin tile for backsplashes. We found unfinished 24″x24″ tin tiles to be the best price point and were able to easily order them online.
Armed with gloves, tin snips and wet erase makers I measured, marked and cut our tin pieces to fit the backsplash space. Then I used a spray on clear coat to seal the tiles before installing them using No More Nails adhesive.
No products found.
In total it took 2.5 tiles to complete the bathroom backsplash which worked out to be $30 including the glue, now that’s blinging on a budget!
8) Hardware
The hinges used in our RV for the cabinet doors were a design I’d never seen before. The hinges basically clamped into a cut out in the door making it difficult to find replacements.
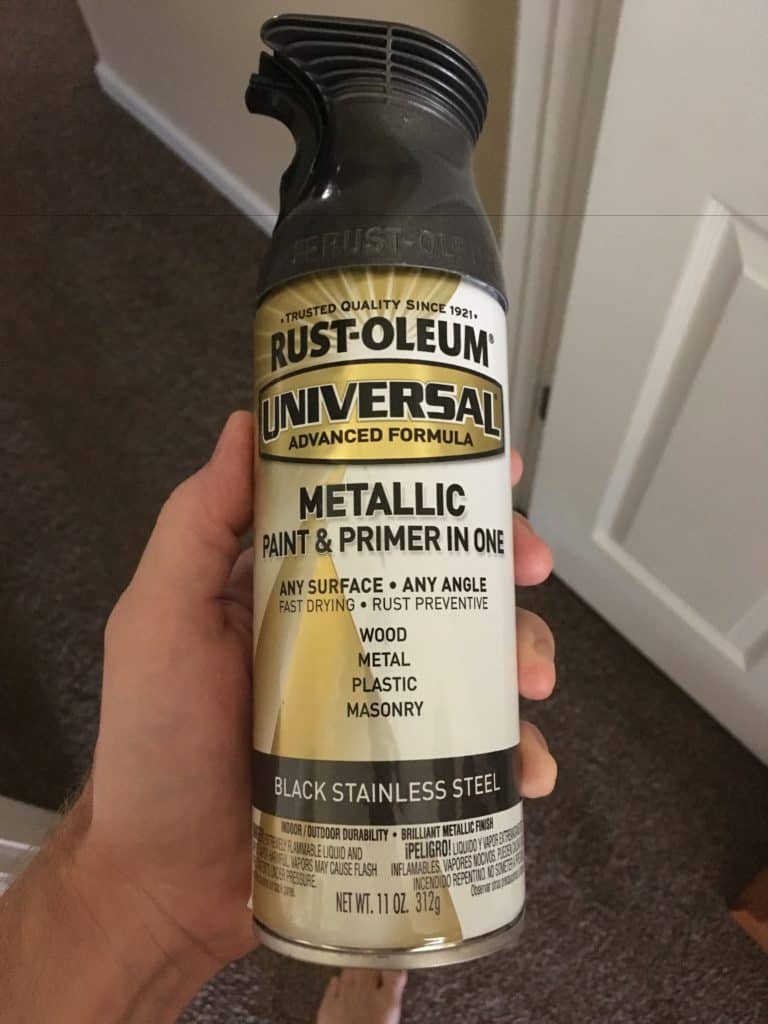
The cabinet pulls actually had a nice shape to them, being simple with a little bit of angling on the edges. To keep it simple and cheaper we decided to spray paint both the hinges and pulls.
After a lot of elbow grease and steel wool, we had cleaned and prepped our hardware for paint. We tried a few different colors to see what would work the best but settle on Black Stainless, a nice metallic balance between black and grey.
Once clean and ready we set up all the hinges, handles, and screws on a piece of cardboard close together but not touching each other. Then, we sprayed on multiple thin coats of paint and primer in one.
We also revamped the metal trim from the shower giving it a similar treatment as the cabinet hardware.
Our old scratched up brass hardware was given a sleek new lease on life with a $7 can of black stainless steel spray paint.
9) Fixtures
We had already committed to getting a new toilet by chucking the other right out of the gate. Fortunately, it was very easy to get a new one off Amazon that was basically the exact same except this one was crisp white not aged yellow.
No products found.
The toilet installed very easily and we opted for a rubber ring instead of a wax one since it seemed like it would hold up a little better with all the shake, rattle and rolling in its future.
No products found.
The sink on the otherhand was a bit of a flop. I had ordered a new sink off Amazon and checked that the dimensions would fit in the counter hole.
What I didn’t do was compare the shape of the old sink to the one online. When the sink arrived it was a case of an oval peg in a rectangular hole. It was not going to work.
So the new sink was sent back and using the remnants of our hardware spray paint we were able to spray the old sink back to life. When clean the black stainless sink looks so good but it shows every toothpaste splatter known to man. If we ever need to update the sink I’ll be opting for a glossy white for ease of cleaning.
We picked a basic chrome faucet for the bathroom sink and matching drain plug. We didn’t bother getting an RV specific faucet here since most seemed to be made of cheap plastic.
The original plumbing had no shut off’s installed on any of the water lines so we added them in while we had the open access. This was more of a nice to have but Beau always insists on them when possible.
We used sharkbite valves since that can be press fit onto existing plumbing without the need to get adapters specific to the pipe’s material. We did this for both the sink and the shower.
No products found.
With the updated trim and new color scheme in the bathroom the shower stall was looking pretty good. It did have a bit of yellowing to it but not nearly as bad as the sink and toilet.
We decided to leave the shower for now, mostly due to time. In the future we may invest in a refinishing kit to get it sparkling white like the rest of the bathroom.
We did purchase an RV specific shower head and faucet. We did this since there is a “trickle” option to reduce water flow while soaping up and to have the option for a tub faucet. Our shower actually has a tiny bathtub.
No products found.
The bathroom came in as follows: Toilet (Amazon) – $125, Shut-offs – $20, shower (Amazon) and sink (Amazon) faucets $60.
10) Admire
With all the cabinet doors reinstalled, hardware mounted and trim in place the end product was far beyond our expectations.
To finish it off we added a hanging organizer, shelves inside the upper cabinet, a stylish towel hook on the door and trimmed down our PVC laundry holder to fit in the cupboard. With plenty of storage, our bathroom was ready to take us on full time.
The final tally totaled up to be $369 with the toilet making up a third of our budget. Overall we utilized our materials well, reused what we could and transformed our tiny brass bathroom into a modern and stylish oasis.
| Item | Cost |
| Paint | $27 |
| Ceiling Tile | $22 |
| Flooring | $55 |
| Counter Top | $25 |
| Lighting | $5 |
| Backsplash | $30 |
| Fixtures | $205 |
| Total | $369 |