This post contains affiliate links.
When we started the reno of our RV we had a couple of things we wanted to take care of. We wanted to reduce the noise and vibration of the engine (we have a small diesel RV) and have some insulation from the heat of the engine compartment under the cockpit.
Automotive insulation can be used to insulate the floor of your RV. It provides noise and vibration reduction while still insulating against heat transfer. It can be installed underneath your flooring of choice.
Choosing the right material, prepping our subfloor, and correctly installing our insulation were all important steps to improving the soundproofing and thermal insulation of our RV.


Table of Contents
Materials Used In This Project
Table could not be displayed.Selecting Material
Our insulation needed to reduce some of the noise and heat of the engine while driving. We also wanted to keep the floor from being too cold in the rest of the RV.
Since we weren’t pulling up the subfloor and we wanted to easily travel without the need to remove and reinstall our insulation whenever we stopped, we opted to install insulation between the subfloor and our new flooring.
There were only a few options that would work for us. Either a rigid foam board or automotive insulation.
Foam Board
Foam board insulation has the advantage of being higher in R-value than automotive insulation, a measurement of how well a material lets heat pass through it. You can also find foam board that is specifically for sound insulation.
While foam board is frequently used in van conversions it, unfortunately, had quite a few drawbacks for our desired installation. The minimum thickness of the foam board is 1/2″. This was a bit thick for our application since our RV doesn’t have the highest of ceilings.
Since the foam is rigid it would be harder to fit around all the nooks and crannies in the RV. Plus, when we’ve used this style of insulation in the past for other projects it makes quite the mess to cut.
Another issue is the foam board is not designed to bear weight. It is typically used in walls or ceilings of homes. So we weren’t sure how well it would stand up when walked on.


Automotive Insulation
We found that automotive insulation would be the best material for the job. It is designed to be used in vehicles to help reduce sound, vibrations, and heat from the engine and exhaust.
While the R-value isn’t too high for automotive insulation, a minimum of 1 but could be higher depending on usage, it is quite thin maybe 1/4″ in thickness. It’s highly flexible allowing it to easily conform to all the strange angles in the RV and can be cut with a pair of scissors.
Another benefit to the automotive insulation is it can act as a vapor barrier. Since both sides are covered in reflective foil and the seams are sealed with reflective tape it will prevent moisture build up on the underside of your flooring. Another win in our books.
Carpet and vinyl plank flooring, our chosen floor replacement mediums, traditionally need an underlay installed to provide cushion and support. Our insulation could now double as an underlay for both flooring options.
We measured our floor space to figure out how much square footage we would need. And made sure to add on 10% as a just in case. Amazon provided an easy way to get our insulation shipped right to our door. This is the specific insulation we purchased from Amazon.com
No products found.
How to Install
Before we started on our installation we had to gather our supplies:
- insulation
- spray adhesive (3M Super 77 Multipurpose Spray Adhesive)
- reflective tape
- utility knife
- scissors
- straight edge
Prepare the Floor
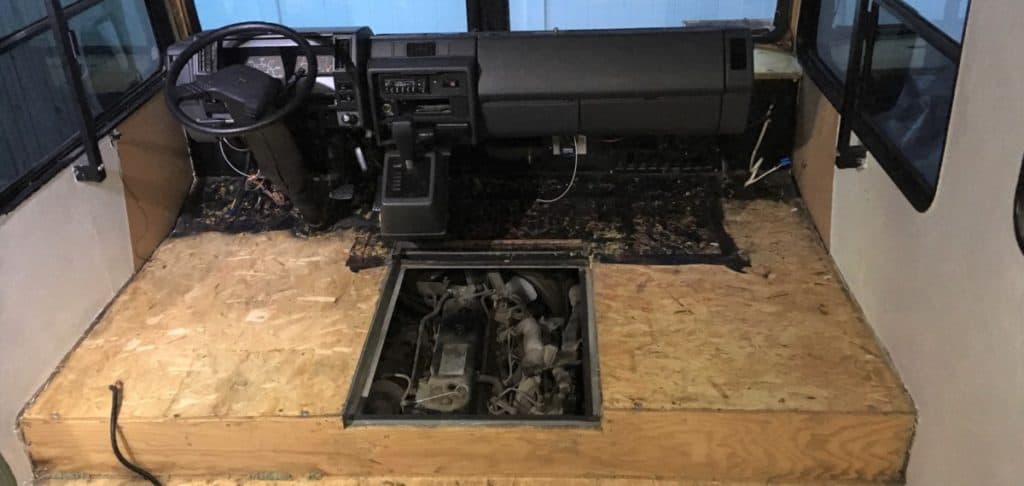
To start, we removed all the furniture from the RV including the captain’s chairs (we were replacing these anyways). Removing the captain’s chairs was an awkward job involving contorting ourselves with one arm in the engine cavity and the other reaching for the top of the bolts.
We then ripped out all the old flooring. The front cockpit had carpet and the rest of the RV had vinyl sticky tiles.
The sticky tiles came up super easy since they were already starting to lift in some places but they left a sticky residue behind.
The carpet needed a bit of muscle to remove. We used a utility knife to makes some cuts along the edges to help us get a grip on the carpet. Once the carpet was removed the underlay needed to be pulled up as well.
This made a huge mess to remove. Since the underlay was so old, it would just rip off in little chunks. It took a lot of elbow grease and scraping to remove.
Then all the staples needed to be yanked out of the floor and everything got a good vacuum and wipe down so it was free from dirt and debris.
Installing the Insulation
Now that our subfloor was clean and ready we made a plan for the order to install our insulation. We decided to start at the front of the RV and work our way back.
We measured and mapped out the shape of the cockpit platform and dash firewall. We decided to also insulate the backside of the dash to further reduce noise and heat transfer.
Once we knew the approximate shape we needed, we drew it on the insulation with a permanent marker and cut it out with a pair of sharp scissors.
We test fit the insulation prior to gluing to make sure we had the right fit and also to cut any holes for wires or vents. These cuts were easily done with a sharp utility knife. Once we were sure the size was just right it was time to start gluing.
We picked 3M 77 Multipurpose Spray for our spray adhesive since they have a good reputation and it will work on foil products.
We took the cut insulation pieces out of the RV and sprayed the adhesive onto the backside. Then, we had to carefully spray the surface inside the RV and reduce overspray as much as possible. Make sure you have plenty of ventilation since you’ll be using an aerosol in a small space.
Next, we needed to let it dry until tacky. This didn’t take long, probably around a minute but it’ll depend on your weather and humidity, just use your knuckle to test for tackiness so you don’t cover your fingers in glue.
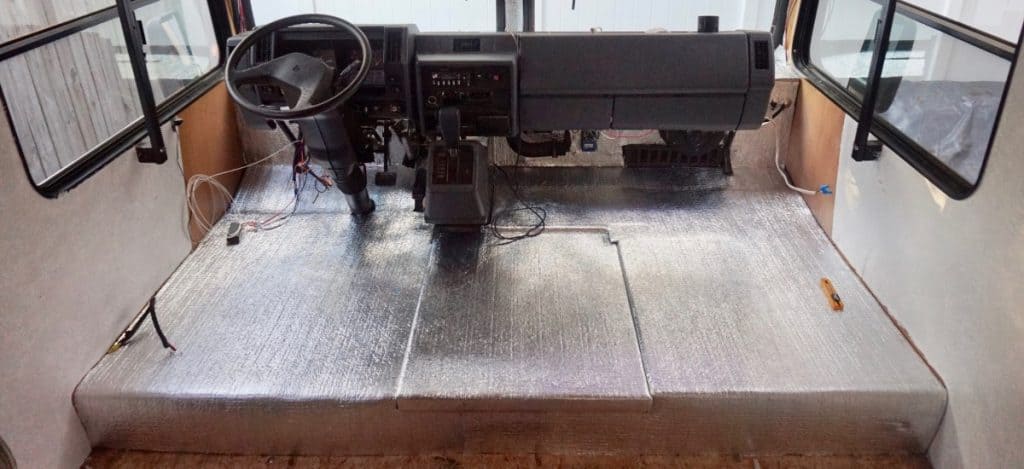
Once tacky we brought the pieces back inside and stuck them to their specific surface. We applied firm, even pressure all over the insulation to get good, even adhesion.
After that, it was basically rinse and repeat. We covered the front firewall, the dashboard, the cockpit floor, the doghouse (engine cover) as well as the floor all the way through the RV. We also made sure the include the stairwell since a lot of road noise would come through them.
We added extra insulation to the underside of the doghouse since this is the main cover and access for the engine and probably the main culprit for engine noise and heat.
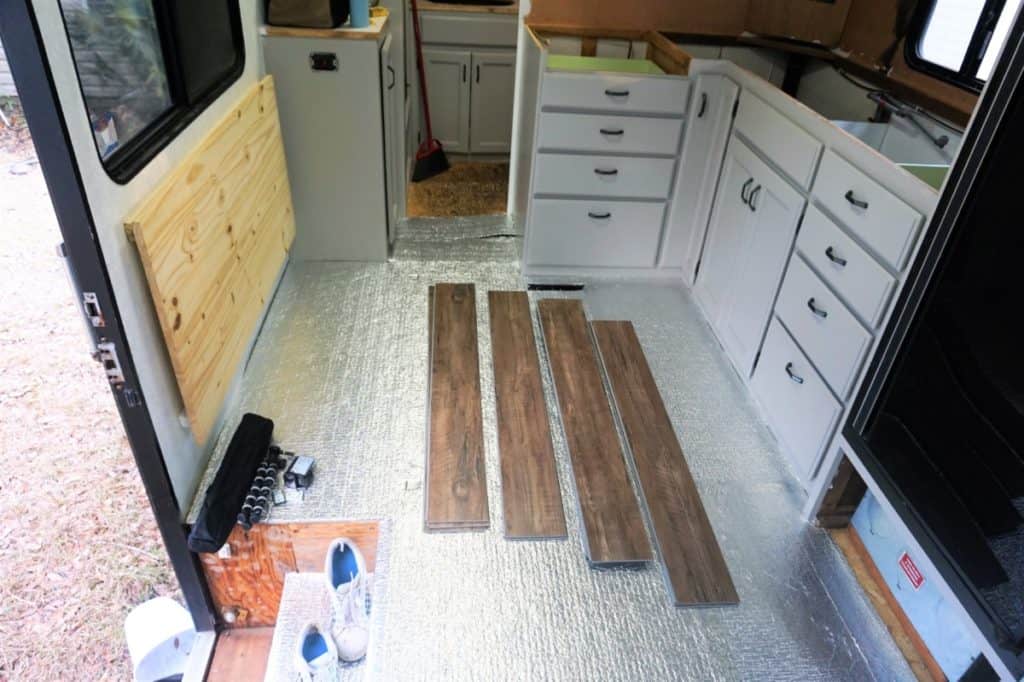
Once we had finished gluing down the insulation we went back and covered all the seams with reflective foil tape. You could also do this as you finished each section but we were on a roll and decided to come back to it at the end.
Next Steps
Now that we had the insulation installed our next steps included installing new flooring and replacing the furniture.
We selected carpet to replace the flooring in the cockpit and vinyl plank flooring for the rest of the RV. We picked carpet for upfront since it would provide another layer of insulation and sound deading.
For the rest of the RV, we decided on a wood look vinyl plank flooring. We picked one that was a “click” install and would be floating. Overall it was pretty easy to install.
Then, we replaced the captain’s chairs, reinstalled the revamped jack-knife couch, and screwed down our storage units.
Overall, it was an easy and inexpensive install. The insulation provided us with a good base for our flooring and some much-needed sound deading and thermal insulation.
See how our amazing Kitchen Renovation, Bathroom Upgrade, and Cockpit Makeover turned out.
Fix It Yourself RV Maintenance Course
The most costly parts of RV ownership are repairs and maintenance. That’s why I recommend learning to do your own RV repair and maintenance.
The Fix It Yourself RV Maintenance Course is the perfect way to learn how to do the most common repairs and maintenance on your RV. A Certified RV Technician wrote and filmed the course so you know the information is actually correct.
Plus it’s downloadable so you can access it from anywhere, even when boondocking in the middle of nowhere with no service.
Find out more about the best RV Maintenance and Repair Course available!